/** Font types */

Posts Tagged ‘paper scraps’

Teaser – Scraps Card

Tuesday, September 28th, 2010

Scrap Card

I am currently working on another video tutorial for another cool recycling project (save those boxes…). I have already finished shooting the tutorial, however the editing takes way more time then I have initially anticipated because my iMovie is a bit capricious these days. Hopefully the tutorial will be up and running very soon but in the meantime I wanted to put up a teaser.

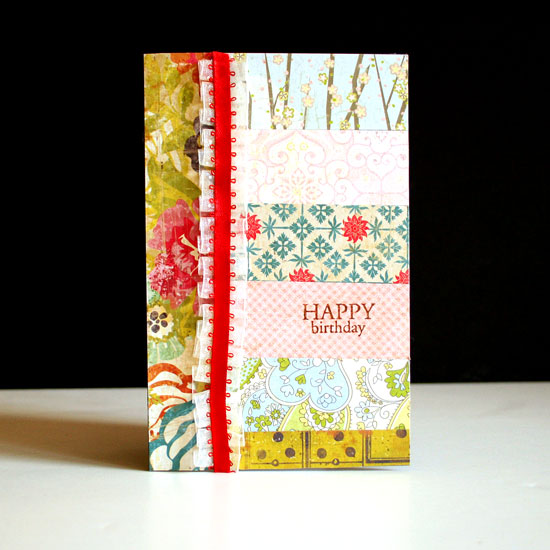
This is a card made with the scraps of paper left after I finished my recycling project.

How To

All I did was to cover the entire card front with dry adhesive and adhere scraps of paper (VERY vintage Basic Grey and “Restoration” by Crate Paper) on it, then cut the excess. I added a couple trims for an added flair and stamped the greeting on the most subtle paper among the scraps.

Until the bigger project will be up, try to make use of your paper scraps and make a card or two… If you do, then please, please, please share it with me 🙂

Make Your Own Planner 2012
Check out Creativity Prompt’s new and unique self paced workshop: “Make Your Own Planner”.
This workshop will show you how to make a beautiful handmade planner for the year 2012. Not only are you going to get the entire meticulously designed planner kit for instant download, but you will also get a high resolution video tutorial as well as step-by-step instructions to guide you on each step of the way. Either treat yourself with a fresh and creative start for the coming new year, or get it to create wonderful gifts for your family and friends.
Join now

Scavenging My Scrap Basket – Creativity Prompt

Monday, March 8th, 2010

My scrap basket is a disgrace. I seem to only use it one way – dumping more and more bits and pieces inside. I have scraps of papers from companies that no longer exist… (not that it’s that difficult in our economy, but I am talking about Chatterbox and the like…).

A scrap basket isn’t supposed to act as a burial place for broken 12 by 12 sheets… It is supposed to live symbiotically with the rest of the supply. Complete and enrich each other.

This is not the case, unfortunately.

My total lack of time drives me repeatedly to my stash of paper pads and loose leaf papers because it is easier, fresher, more approachable. Not the most economically and environmentally friendly way of working with papers… I know.

Sometimes I am determined to work with my scraps, and I usually love the result but it doesn’t happen frequently enough.

This weekend I felt like pulling out my scrap basket and see what treasures I can find inside, here is what I made –
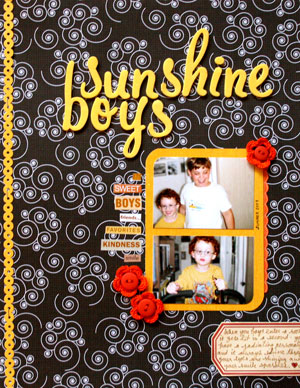
Sunshine Boys Layout
Supply

Patterned papers: Black River, Sassafras, Chatterbox.

Letter stickers: American Crafts, Making Memories.

Embellishments: Paper frills by Doodlebug Designs, buttons by We R Memory Keepers, Crochet flowers – handmade.

Journaling tag: Creativity Prompt.

Tools: Tim Holtz (Tiny Attacher + Scissors), We R Memory Keepers Corner Chomper.
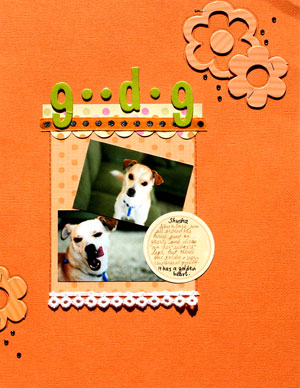
Goodog Layout
Supply

Patterned papers: Black River, KI Memories.

Cardstock & letter stickers: American Crafts.

Embellishments: Ribbon: American craft (orange), Other (lace). Chipboard accents: Making Memories. Jewels: Basic Grey.

Journaling tag: Creativity Prompt.

Tools: Tim Holtz. (I absolutely love the Tiny attacher. I was skeptic at first, but it goes through the chipboard like butter)
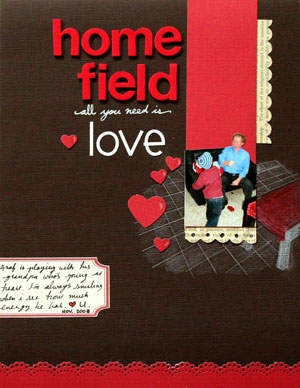
Home Field Layout
Supply

Patterned papers: vintage textbook paper.
Cardstock: Bazzill (dark brown) DCWV (red).

Letter stickers: American Crafts, Doodlebug Designs; White gel pen: Uniball Signo.

Punches: Martha Stewart (Heart + Doily Lace), Fiskars (Threading Water + Scallop Sentiment), Other: Small heart.

Journaling tag: Creativity Prompt (will be posted soon).

Other: colored pencils (Prisma)

Share

Have you been working with your paper scraps lately? What relationship do you have with your scrap basket/ drawer/ tray? Please share and leave a comment.

If you have any question, suggestion or remark – don’t hesitate to contact me – either leave a comment here, use the contact form or start a new thread on the Creativity Prompt Flickr Group!!!

I would also be very happy to see your own creations, so don’t be shy and share 🙂

Make Your Own Planner Workshop
This year you can really make your dream come true!

“Capture Your Dream” workshop is a self-paced, six weeks long workshop, that will walk you through a journey of capturing your biggest dream and making it come true.

In the process of making your dream happen – with lots of inspiration and guided self-exploration, you will also create a mixed media mini album from scratch and learn many tips and techniques – including some photography pointers that will add character to your photos and will help you take better pictures of your projects.

The workshop includes 30 printable PDF lessons with step-by-step pictures and instructions as well as several printable templates you may use in other projects too.

I am confident you will enjoy it and find it helpful so I also offer full money back guarantee while the workshop lasts.

Creativity Prompt – How To Use Those Paper Scraps

Friday, April 3rd, 2009

How To Use Those Paper Scraps If you are anything like me then you probably have a ton of paper scraps. The scrapbooking industry keeps on wowing us with delicious patterned papers and I feel bad about throwing away any tiny little cut out… Not to mention the environmental repercussions of tossing all that paper (read: severed trees) away.

I have found a great “marriage” between my current stash of paper scrap and patterned paper which is still on my wish list. I have derived inspiration from the wonderful new collections from Sassafras Lass and recreated my own patterned paper design, while using only paper scraps.

Sassafras Lass I was particularly inspired by the “Dream Big” patterned paper from the “Anthem” collection.

So if you are interested in recreating this layout while using all your little paper scraps – stay tuned and keep on reading:

Supply –

How To –


[Go to YouTube to watch the video in HD and feel free to rate, comment and subscribe]

Step By Step Instructions –

  1. Take a piece of scrap paper (I used recycled newsprint paper) and cut it to the size of your desired design. Mine is 8″ by 8″.
  2. Cut a circle from your scrap piece of paper. It doesn’t have to be centered. Just position it whenever you’d like your focal picture to be.
  3. With a pen and a ruler start drawing your design.
  4. After you are pleased with your design, list all your individual shapes by number, this will make your life much easier later on.
  5. Cut each individual shape with your scissors. Don’t worry about the curvy part, as your focal picture would lay over it.
  6. Now it’s time to get all your paper scraps. Use as many or as little textures, colors and patterns as you like.
  7. Adhere each individual shape to the back of your paper scrap. Make sure the number faces down (just apply your adhesive to the number itself, to avoid “mishaps“). Don’t forget to rewrite the number again at the back…
  8. Using those numbers, reassemble your design and adhere all the individual shapes onto your background cardstock.
  9. Adhere your focal picture with foam adhesive. The photo doesn’t have to be circular. I just think it adds some extra flair. (You can crop your photo with a photo editing software, such as Adobe Photoshop Elements, or you can use any circle cutting system you feel comfortable with).
  10. Add your title and call it good (Well, except for some journaling).

Share –

If you have any question, suggestion or remark – don’t hesitate to contact me – either leave a comment here, use the contact form or start a new thread on the Creativity Prompt Flickr Group!!!

I would also be very happy to see your own paper-scraps creations, so don’t be shy and share 🙂