/** Font types */

Archive for the ‘creativity prompt’ Category

The Bare Bones Of A Travel Journal

Wednesday, November 17th, 2010

Today I just wanted to share my on-the-go travel journal for my next vacation in Hawaii.

The idea and the reason it came about were easier for me to explain on video, so here it is:

[Go here to watch on YouTube and while there, please rate, comment and subscribe.]

Feel free to download the travel journal page as well as the back page for your own personal use and enjoyment. [To download right-click on each link and opt for the “save target as” option.]

[P.S. You can find the flat package of mini glue dots here]

Share

Are you planing on going somewhere special soon? Do you travel for the holidays? How do you collect your travel memories?

Make Your Own Planner 2012
Check out Creativity Prompt’s new and unique self paced workshop: “Make Your Own Planner”.
This workshop will show you how to make a beautiful handmade planner for the year 2012. Not only are you going to get the entire meticulously designed planner kit for instant download, but you will also get a high resolution video tutorial as well as step-by-step instructions to guide you on each step of the way. Either treat yourself with a fresh and creative start for the coming new year, or get it to create wonderful gifts for your family and friends.
Join now

Micro Journaling – Current Journal

Monday, November 15th, 2010

Current Journal

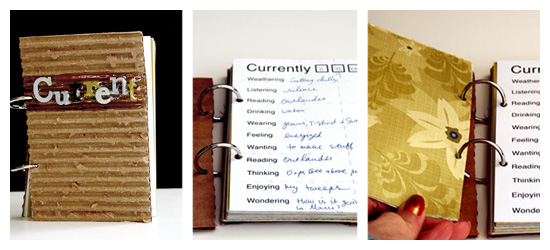
I saw this idea first on Elise Blaha’s blog and I fell in love immediately. Apparently, the first to start the awesome “Currents” movement is talented Tina Aszmus – kudos to her.

The idea of micro journaling is just perfect for someone who likes to record everyday life but feels overwhelmed about it [Me. Me. Me].

One of my favorite things is going over old journals and reliving the days I took the time to record.

One of my deepest regrets is getting rid of the journal I’ve had all through high school and through law school. I mostly wrote bad things in it. Bad experiences. I think most of it was filled with teen unrequited love (I believe that goes hand in hand with being a teenager).

At the time I got rid of it I thought it will be therapeutic to get rid of all the harsh memories and concentrate on all the happiness and loveliness I have in my life. But in retrospective, I do regret throwing it away, because it seems like I have thrown away parts of my life. Not to mention that some of my best writing was manifested there.

Anyhow, let bygones be bygones. [and it’s not like I can unearth it from the dumpster in Dublin]

This mini journal was so easy to make and I printed it on the back side of some OLD [even ancient] patterned papers. I got hooked on the idea of printing on patterned paper after I saw one of my workshop’s member, Mandy do that – amazingly! The only difference is that I printed mine on the back side of the pages and Mandy used double sided papers and printed her pages on the pattern.

Tools & Supply

  • Word processing software (I’m not providing a printable, because it isn’t an original idea of mine)
  • Old patterned paper
  • Recycled cardboard
  • Crop-a-dile
  • Binding rings
  • Chipboard letter stickers [mine are from Making Memories “5th Avenue” collection that I bought a while back]

How To

  1. Create a 4″ by 6″ page with your regular word processing software (make sure the page settings are set to the right size for easy printing) where you make a list of the categories you want to record
  2. Cut all your extra paper to 4″ by 6″ pieces (6 pieces out of each 12 by 12 sheet, unless you discard parts that have the company’s logo on it)
  3. Feed your cut paper through your printer, the same way you put a 4″ by 6″ photo paper in it to print photos.
  4. Cut 2 thicker 4″ by 6″ pieces for the cover. I used corrugated cardboard.
  5. Punch hols for the binding (or use any binding system that you love using).
  6. Bind all the pages together with binding rings or ribbon.
  7. Write. Write. Write. [Just put it on your desk, nightstand or purse and fill in a page whenever you have a minute – that’s all it takes].

Share

What do you think about the idea of micro journaling? Share your thoughts by leaving a comment.

Make Your Own Planner 2012
Check out Creativity Prompt’s new and unique self paced workshop: “Make Your Own Planner”.
This workshop will show you how to make a beautiful handmade planner for the year 2012. Not only are you going to get the entire meticulously designed planner kit for instant download, but you will also get a high resolution video tutorial as well as step-by-step instructions to guide you on each step of the way. Either treat yourself with a fresh and creative start for the coming new year, or get it to create wonderful gifts for your family and friends.
Join now

Heart Breaker And The Miraculous Act Of Extraction

Wednesday, November 10th, 2010

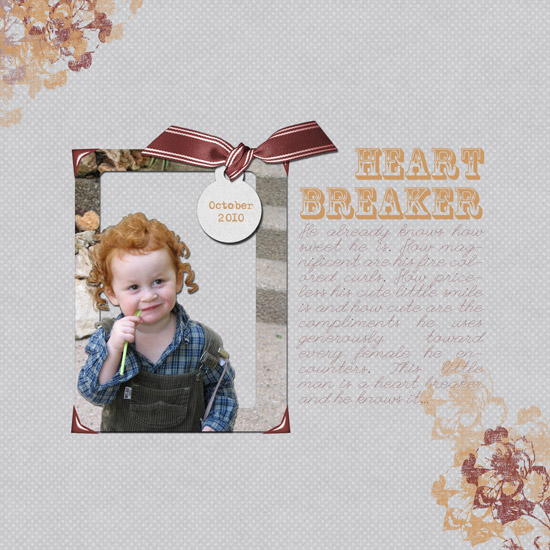
Heart Breaker

[Fonts: Adler, Rosewood and League Script; Digital Kit: Our story by Karla Dudley for DHD.]

I was so honored to find out on the 2Ps Digi Designers blog last week that Shannon, the digital pea of the week, had picked one of my layouts as a favorite. That’s why I took it as a personal challenge to create a digital layout using an extraction, which has been Shannon’s challenge for this week.

I picked a picture of my youngest nephew (for the time being…), Ori for two reasons.

First, he’s so darn cute.

Second, because his beautiful, dare I say PERFECT, curls will be beautifully accentuated by extracting them from the background.

Let me take you through the process of extraction…

How To in Photoshop Elements

  1. Pick the Quick Selection Tool and choose a brush size you feel comfortable with. I always start with a bigger brush and go smaller as I move into the smaller areas of the photo. To easily change the size of your brush use the bracket keys (‘[‘, ‘]’).
  2. To select an area you need to click on it and the quick selection tool will do its magic by figuring out the changes in colors and tones. You can adjust its sensitivity if you wish to do so, by clicking the drop menu that comes out of the brush indicator on the top of the window (above the rulers). The more pronounce the object is compared to its background, the smoother the selection will be.
  3. After the image you want to extract is selected press ctrl+J with a PC and cmd+J with a MAC to create another layer with the extracted image. It will not be perceivable until you conceal the layer with the original photo. You can do that by clicking the eye icon next to the layer on the layers’ bar.
  4. Now that the extracted image is clearly visible, you may clean up random pixels by erasing them. Make sure your extraction layer is highlighted, so you won’t accidentally erase something else on your page.
  5. Now you can do anything to the original photo layer, as long as the extracted image stays on top. Note, that if you keep both layers, I advise you to link them together.
    • You can delete the photo all together and work just with the extraction.
    • You can blur it, to make the extracted image pop up – make sure the photo’s layer is highlighted. Go to ‘filter’ – ‘blur’ – ‘Gaussian blur’ and play around.
    • You can delete just part of the layer, like I did. Draw a shape on the photo – make sure the shape’s layer is between the photo’s and the extracted image’s layer. Select the area around the shape by pressing ctrl or cmd while you click on its icon. Then conceal or erase the shape’s layer and while the area is still selected and the photo’s layer is highlighted – press delete.

That’s it. super easy, right?

Journaling Reads:

He already knows how sweet he is. How magnificent are his fire colored curls. How priceless his cute little smile is and how cute are the compliments he uses generously toward every female he encounters. This little man is a heart breaker and he knows it…

Share

Do you use extractions on your layouts?

In traditional scrapbooking it means cutting around the image you wish to extract… I used to do that all the time.

Make Your Own Planner 2012
Check out Creativity Prompt’s new and unique self paced workshop: “Make Your Own Planner”.
This workshop will show you how to make a beautiful handmade planner for the year 2012. Not only are you going to get the entire meticulously designed planner kit for instant download, but you will also get a high resolution video tutorial as well as step-by-step instructions to guide you on each step of the way. Either treat yourself with a fresh and creative start for the coming new year, or get it to create wonderful gifts for your family and friends.
Join now

Video Tutorial – Dimensional Ornaments Card

Tuesday, November 9th, 2010

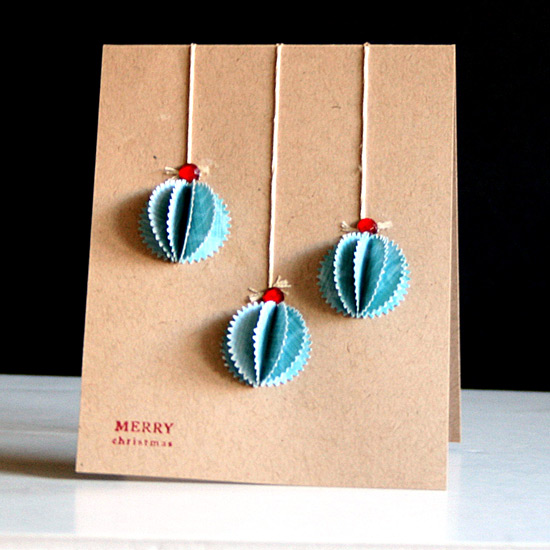
Dimensional Ornaments Card

I wanted to share with you a quick and simple card I made. You can also use the same technique to create ornaments for your tree. You may use any symmetrical shape to make it.

Supply

How To


[Go here to watch on YouTube and while there, please rate, comment and subscribe.]

Step by Step Instructions

  1. Cut you cardstock at 4¼” lengthwise and fold in half to create your card base.
  2. For each ornament, punch 5 punched pieces of patterned paper and fold each one in half.
  3. Adhere only one half of the punched piece to the second one, making sure the edges are aligned and repeat on all five punched pieces.
  4. Repeat for all the ornaments you want to add to your card.
  5. Decide how you want to lay your ornaments on your card and pierce a hole on top of each ornament and another hole on the fold of the card in a straight line above each ornament.
  6. Thread your embroidery floss through both pierced holes and tie at the bottom, close to the top of each ornament.
  7. To secure the knot, apply a glob of a strong liquid glue on each knot and attach a gem to it, to conceal the glue.
  8. Adhere the ornaments below each knot.
  9. Stamp your greeting.

Share

What holidays are you celebrating in the next couple months? I am really excited about Hanukkah, the Festival of Lights. Share yours by leaving a comment below.

Make Your Own Planner 2012
Check out Creativity Prompt’s new and unique self paced workshop: “Make Your Own Planner”.
This workshop will show you how to make a beautiful handmade planner for the year 2012. Not only are you going to get the entire meticulously designed planner kit for instant download, but you will also get a high resolution video tutorial as well as step-by-step instructions to guide you on each step of the way. Either treat yourself with a fresh and creative start for the coming new year, or get it to create wonderful gifts for your family and friends.
Join now

Free Workshop – Giving Thanks Journal

Tuesday, November 2nd, 2010

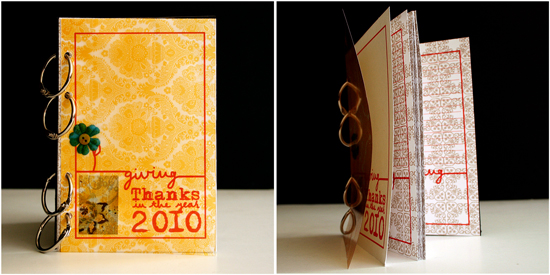
Thanksgiving Journal

Thanksgiving Day is quickly approaching and I thought that a great way to give thanks is to collect all the things and all the people we are grateful for and write about them in a mini journal.

This Giving Thanks journal is what I came up with. It is 4″ by 6″ so it fits perfectly with 4″ by 6″ standard size photos and therefore quick and easy to put together.

I made the journal kit for you and created a video showing you how to put the journal together – in REAL TIME. You wouldn’t believe how easy it is to make.

Feel free to use it as many times you need, for personal use only and don’t forget to link back here, if you show your project online 🙂

The Journal Kit

To download each of the journal pages – right click on the link below and opt for “save target as”:

  1. Cover page. [Print once on 4″ by 6″ piece of cardstock]
  2. Insert page. [Print as many time as you want, on 4″ by 6″ paper. You can also use the backside of your photos to print on]

Supply

  • Cardstock – to print the journal pages on. You can also use patterned paper or the back side of your photos for the inner pages. Each sheet of 12″ by 12″ patterned paper yields 6 pieces of 4″ by 6″ paper.
  • Cover pieces – I used 4″ by 6″ transparency and 4″ by 6″ piece of chipboard.
  • Hole punch
  • Small binding rings (or ribbon, twine, etc.)
  • Pencil

How To


[Go here to watch on YouTube and while there, please rate, comment and subscribe.]

Step by Step Instructions

  1. Print the journal pages. You need 1 cover page and as many inserts as you please. It is simpler to first cut all the pages to 4″ by 6″ and then use them with your printer, the same way you would use photo paper.
  2. Punch all the punching holes by aligning the black punching marks with your hole punch. Make sure both the mark and the hole punched are centered together – then punch.
  3. To punch the chipboard piece (and your insert photos) align any of the punched pages with the chipboard piece and mark all the holes with a pencil. Then repeat the previous step with the chipboard.
  4. Put together all your pages and bind with the binding rings.

Share

What are you thankful for this year?

If you enjoyed this workshop you would probably enjoy the more elaborate “print and assemble” workshops by creativity prompt.

Try “Welcome Little One” if you are expecting a new baby to enter your life or the life of a loved one and “Make Your Own Planner 2012” to create your very own industrial chic planner.

Be You – A Blast From The Past

Monday, November 1st, 2010

Be You

[Fonts: Adler and Halo Handletter; Digital Kits: mostly “Be You” and the white stitches are from Digi Essentials Elements – all by Karla Dudley.]

Journaling Prompt

Karla Dudley’s new collection Be You has inspired me to look for a picture that can showcase who am I.

I do not have that many pictures of myself, as I am mostly on the other side of the camera… (not such a good idea) but I still have a few laying around. The pictures I have are from different times in my life, so they made me thinking of people and who they are.

People change all the time. They change physically, emotionally, professionally, romantically and in many other ways too.

However, even after a person changes he still carries around with him some of what he was before.

I am not different. I carry with me lots of bits and pieces of what I have been in my life time.

I carry with me an obsession for reading that my 5 year-old self sparked when she started reading on her own.

I carry with me the resilience of my 6 year-old self who overcame a serious illness.

I carry with me passion for fashion and design from my 11 year-old self who wanted to be a fashion designer and draw different outfits relentlessly.

I carry with me the love of writing that my 15 year-old self used when she won two writing competitions.

I carry with me the leadership and responsibility of my 17 year-old self who was the head of her school’s student body.

I carry with me the fear of war and redundant hatred from when my 18 year-old self survived an atrocious murder but my best friend’s sister didn’t.

I carry with me the sense of accomplishment of my 24 year-old self who got her license to practice law after 4 years at the university and a year as an intern.

I carry with me a strong moral campus I got from my 25 year-old self who sought truth and justice and was willing to work 60-hour weeks, sometimes 76… to get it.

I carry with me the joy of tying the knot with my one and only true love, my husband Nadav.

I carry with me the adventurousness of my 27 year-old self who left everything and moved abroad with her husband of 3 months.

I carry with me the ability to cope and adjust from my 28 year-old self who had moved again to another country in another continent, even farther away from home.

I carry with me bits and pieces from every day I have lived on earth and every bit and every piece is making me who I am today.

Share

What are you carrying with you from your old self? Share by leaving a comment.
Make Your Own Planner 2012
Check out Creativity Prompt’s new and unique self paced workshop: “Make Your Own Planner”.
This workshop will show you how to make a beautiful handmade planner for the year 2012. Not only are you going to get the entire meticulously designed planner kit for instant download, but you will also get a high resolution video tutorial as well as step-by-step instructions to guide you on each step of the way. Either treat yourself with a fresh and creative start for the coming new year, or get it to create wonderful gifts for your family and friends.
Join now

If You Wish Upon A Star – Digital Video Tutorial

Thursday, October 28th, 2010

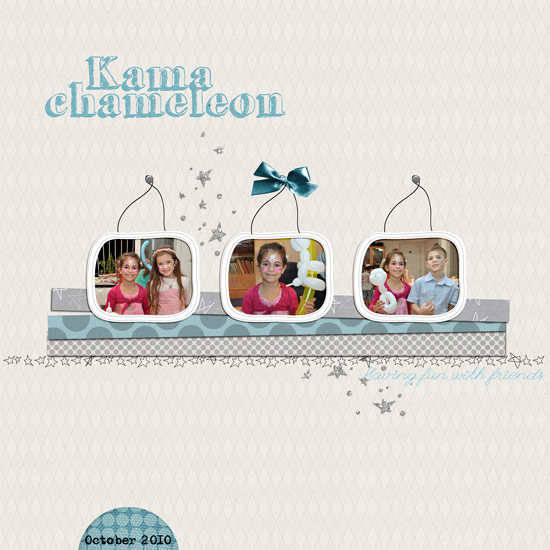
Kama Chameleon

[Fonts: Adler, Grutch Shaded and League Script; Digital Kits: Wish by Karla Dudley.]

This layout is of my 7 year-old niece and her friends playing dress up.

These pictures remind me how every time I put on a costume (Halloween, anyone…) it makes me feel like I am also getting super powers.

By dressing up as a princess I can also call upon the stars and make a wish.

Have you ever felt that way too?

Anyhow, this is why I thought these photos will be perfect to be used in conjunction with Karla Dudley’s newest kit “Wish”. [UPDATE: Karla’s kit is no longer available, but she offers all the digital patterned papers from the kit as a FREE download on her blog.]

Have you made a wish lately?

If not, now is the perfect time to do so.

Just because.

I also wanted to show you how I used the transparent frames that came with the kit, and more precisely – how I fit the photos to the frames.

You can use the same technique to any transparent digital element that you want to use as an overlay.

How To


[Go here to watch on YouTube and while there, please rate, comment and subscribe.]

Make Your Own Planner 2012
Check out Creativity Prompt’s new and unique self paced workshop: “Make Your Own Planner”.
This workshop will show you how to make a beautiful handmade planner for the year 2012. Not only are you going to get the entire meticulously designed planner kit for instant download, but you will also get a high resolution video tutorial as well as step-by-step instructions to guide you on each step of the way. Either treat yourself with a fresh and creative start for the coming new year, or get it to create wonderful gifts for your family and friends.
Join now
How To Make Your Own Deco Tape

Thursday, October 21st, 2010

Deco Tape

I LOVE deco tapes.

I always last after beautifully composed photos of beautiful tape.

But I don’t have any of them beauties.

I guess their price doesn’t translate well when I think of their utility…

Then, you can imagine my utter delight when I stumbled upon this DIY Deco Tape Tutorial by my favorite diy-er, Sara.

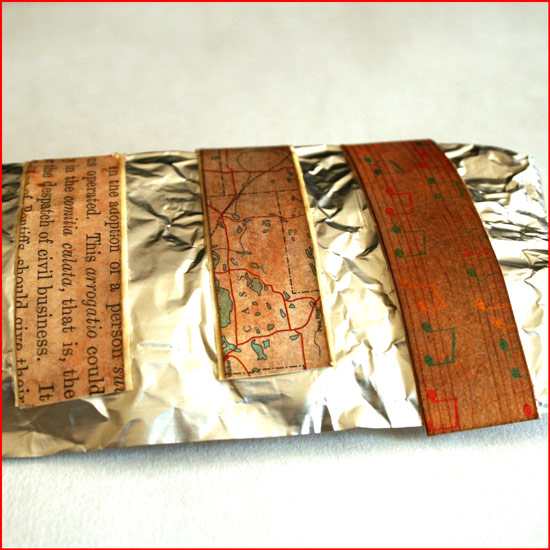
As my doodling skills are not as impressive as Sara’s, I immediately thought of using patterned paper strips with Mod Podge. It is so easy and the result is quite pleasing.

Although it doesn’t look exactly like “the real deal”, it is very close to it and much more affordable, not to mention – more flexible as for what colors/patterns you’ll be using.

Don’t stop there, you can also ink the tape, stamp on it or just leave it as is and boost its confidence with some pep talk… (Where am I going with that?)

Supply

How To


[Go here to watch on YouTube and while there, please rate, comment and subscribe.]

Step by Step Instructions

  1. Measure the width of the tape you’re using and cut paper strips, the same width as the tape.
  2. Prepare the strips by inking them with distress ink (optional) and conditioning them with water. To do that saturate the strips with a couple spritzes of water using a mister. To add some sheen I added 2 tiny scoops of golden perfect pearl medium to the tap water, but that’s optional too. Blot the excess water with paper towels.
  3. When the strips are completely dry, temporarily adhere the masking tape, in the length of your choice, to a non-stick mat.
  4. Apply a layer of Mod Podge to the tape – not too thin and not too thick – and adhere the paper strips to it. Apply more glue, if necessary. Eliminate all air bubbles by applying pressure with your finger on top of the paper strips. Use your finger, as if it was a brayer. Then let it dry – COMPLETELY.
  5. Apply a second, top layer, of Mod Podge. Apply it generously – it will be used as a sealer. Let it dry COMPLETELY.
  6. Remove the excess glue by going over it with your fingers and peel off the tape from the non stick mat. Transfer the tape to a non stick sheet you use in the kitchen. You can also roll them against a round handle (the brush’s handle is perfect for that) to make your own tape-roll.

Share

Do you work with deco tape? What do you use it for? Please share by leaving a comment.

Make Your Own Planner 2012
Check out Creativity Prompt’s new and unique self paced workshop: “Make Your Own Planner”.
This workshop will show you how to make a beautiful handmade planner for the year 2012. Not only are you going to get the entire meticulously designed planner kit for instant download, but you will also get a high resolution video tutorial as well as step-by-step instructions to guide you on each step of the way. Either treat yourself with a fresh and creative start for the coming new year, or get it to create wonderful gifts for your family and friends.
Join now
Obsessed

Wednesday, October 20th, 2010

Obsessed

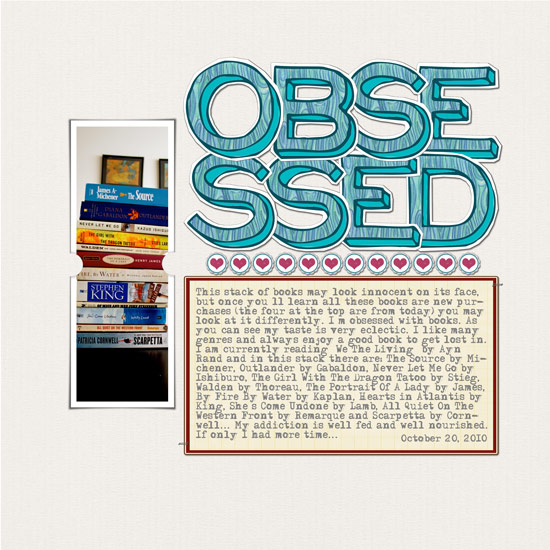
[Font: Adler; Digital Kits: Fly Boy, Frame Essentials and Digi Essentials by Karla Dudley as well as You Are amazing, Can’t Buy Me Love and Aged Labels by Shimelle Laine for Two Peas In A Bucket.]

The journaling on my layout describes my obsession quite clearly, here you go:

This stack of books may look innocent on its face, but once you’ll learn all these books are new purchases (the four at the top are from today) you may look at it differently.
I’m obsessed with books.
As you can see my taste is very eclectic. I like many genres and always enjoy a good book to get lost in.
I am currently reading “We The Living” by Ayn Rand and in this stack there are:

  1. The Source by Michener
  2. Outlander by Gabaldon
  3. Never Let Me Go by Ishiburo
  4. The Girl With The Dragon Tatoo by Stieg
  5. Walden by Thoreau
  6. The Portrait Of A Lady by James
  7. By Fire By Water by Kaplan
  8. Hearts in Atlantis by King
  9. She’s Come Undone by Lamb
  10. All Quiet On The Western Front by Remarque
  11. Scarpetta by Cornwell

My addiction is well fed and well nourished.
If only I had more time…

Share

Have you grabbed a good book lately? Please, do share!
[There’s a good chance I’ll get it if I don’t already have it…]

Make Your Own Planner 2012
Check out Creativity Prompt’s new and unique self paced workshop: “Make Your Own Planner”.
This workshop will show you how to make a beautiful handmade planner for the year 2012. Not only are you going to get the entire meticulously designed planner kit for instant download, but you will also get a high resolution video tutorial as well as step-by-step instructions to guide you on each step of the way. Either treat yourself with a fresh and creative start for the coming new year, or get it to create wonderful gifts for your family and friends.
Join now
Tell Me How You Eat Your Sandwich And I’ll Tell Who You Are

Tuesday, October 19th, 2010

Tell Who You Are

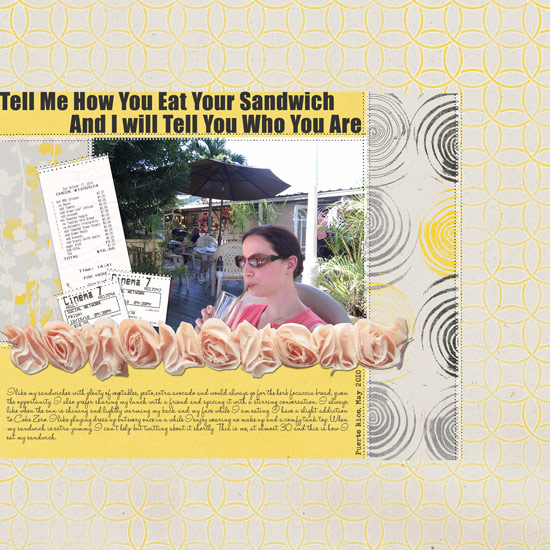
[Fonts: Impact, Adler, Halo Handletter; Digital Kits: Friends and Digi Essentials by Karla Dudley and The Apple Of My Eye by Vinnie Pearce for Two Peas In A Bucket.]

That’s it folks, tomorrow I’m turning 30.

What am I like? you want to know…

Well, I’ll tell you how I eat my sandwich:
(click on the photo for a larger view)
[Journaling reads]

I like my sandwiches with plenty of vegetables, pesto, extra avocado and would always go for the herb focaccia bread, given the opportunity. I also prefer sharing my lunch with a friend and spicing it with a stirring conversation. I always like when the sun is shining and lightly warming my back and my face while I am eating. I have a slight addiction to Coke Zero. I like playing dress up but every once in a while I enjoy wearing no make up and a comfy tank top. When my sandwich is extra yummy, I can’t help but twitting about it shortly. This is me, at almost 30 and this is how I eat my sandwich.

Share

How do you eat your sandwich? Please share by leaving a comment here.

Make Your Own Planner 2012
Check out Creativity Prompt’s new and unique self paced workshop: “Make Your Own Planner”.
This workshop will show you how to make a beautiful handmade planner for the year 2012. Not only are you going to get the entire meticulously designed planner kit for instant download, but you will also get a high resolution video tutorial as well as step-by-step instructions to guide you on each step of the way. Either treat yourself with a fresh and creative start for the coming new year, or get it to create wonderful gifts for your family and friends.
Join now