/** Font types */

Author Archive

Creativity Prompt #22 – The “One-Sheet” Mini Album

Friday, October 24th, 2008

Multiple Mini Albums

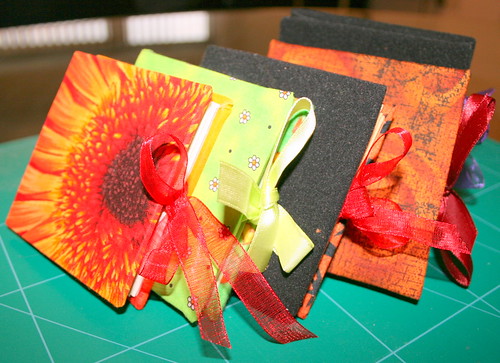
This week’s Creativity Prompt is to make a cute mini album, or journal – what ever you wish to use that for – using a single sheet of cardstock and a couple of chipboard squares (or recycled cardboard…). For a special touch I covered the chipboard squares with fabric, and it turned out fabulous 🙂

Supply –

Instruction –

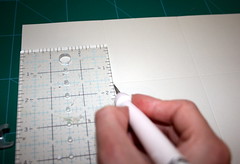
  1. Score the cardstock at: 3″, 6″ & 9″ (every 3″). I used a stylus for the scoring.
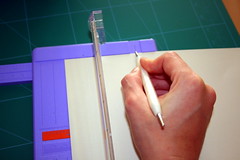
    Scoring with a stylus
  2. Flip the cardstock sideways and score it at: 3″, 6″ & 9″. You should end up with a grid of 3″ by 3″ scored squares.
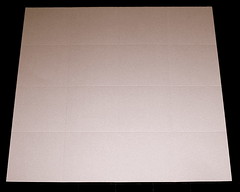
    Scored grid
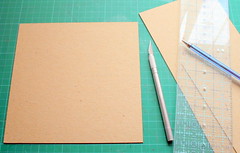
  3. Cut 9″ along the score lines of one side of the cardstock, alternating between cutting top to bottom and cutting bottom to top. The template below might help to understand it better:
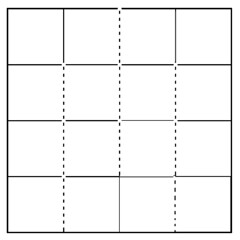
    Cutting template
    Cutting along the score lines
  4. If you happen to cut the cardstock in the wrong direction (e.g. cutting from top to bottom consecutively) don’t worry. I had accidentally done that and created a great project out of it. Stay tuned for the instructions on next week’s Creativity Prompt!!!

  5. Fold each score line in an accordion fold (once up and once down) until you are left with a 3″ by 3″ booklet.
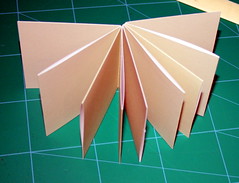
    Folding along the score lines
    For making the little booklet sturdier, I adhered the inner pages on one side, using a tape runner (you can also use a glue stick, although it’s much messier).
  6. Cut two chipboard squares at 3¼” by 3¼”.
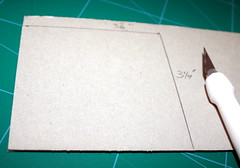
    Cutting the chipboard cover
  7. Generously apply glue with your glue-stick to one side of the chipboard and adhere it to the center of the fabric strip.
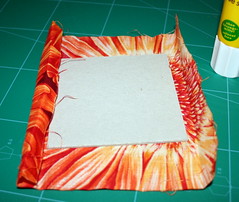
    Adhering the fabric to the cover
  8. Cut the corners of the fabric strip in an angle, and leave about a ¼” (or more) from the chipboard edge.
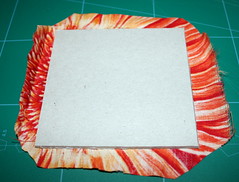
    Cutting the corners of the fabric for the cover
  9. Adhere the remaining fabric flaps to the chipboard with your glue stick. First adhere two flaps which are opposite to each other and then adhere the remaining two flaps, while tacking in the corners for a neat fold.
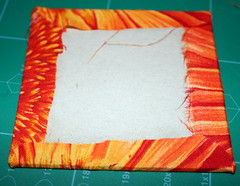
    Adhering the fabric flaps to the cover
  10. Position the two covers, wrong side up, about ½” apart from each other. Apply a strip of a strong double sided tape to the middle of each cover and adhere the ribbon to it – while keeping the ½” gap. Make sure the ribbon is long enough to allow tying the mini-album in a nice bow.
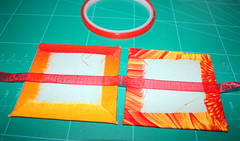
    Attaching the ribbon to the covers
  11. Apply double sided tape to both sides of the mini booklet – make sure to cover all the edges.
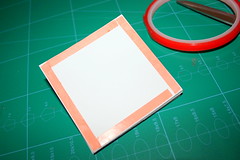
    Adhering the cardstock booklet to the covers
  12. Adhere the booklet to the inside of the cover and voilà!!!
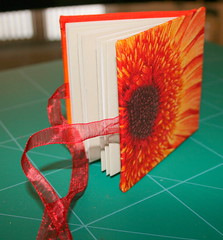
    Finished mini album

Enjoy!!!

If you have any question, suggestion or remark – don’t hesitate to contact me – either leave a comment, use the contact form or start a new thread on the Creativity Prompt Flickr Group!!!

I would also be very happy to see your own creations, so don’t be shy and share 🙂
Journaling Prompt #22 – You Are Tagged

Wednesday, October 22nd, 2008

My childhood I was tagged by Hagit and by Anat, both are very talented Israeli artists (who also have another day job…). Even if you do not understand Hebrew, I highly recommend visiting their blogs for the visual inspiration.

The rules of this meme are simple:

  1. Link to your “taggers” on your post.
  2. Include the rules of the meme in your post.
  3. Write 7 random facts about yourself.
  4. Tag 7 other bloggers and notify them by commenting on their blog (I’ll skip this part, sorry, I’d rather leave an open invitation).

As I am trying to keep this blog as useful as possible for you, I will write a few words about this “tagging meme” and why I think you can benefit from playing along with it.

I am a great advocate to preserving life’s stories. I have even suggested to precede the stories to the photos. I believe we should give as much attention to the memories and the stories behind the yellowing photos as we give to taking and keeping the photos. I would even go further more and bluntly say I believe we should give more attention to the words.

However, saying it is much easier than actually doing it… If we are not used to recording our life’s stories than we have a life time of catching up before us… So many stories to tell and no idea where to start.

The “tagging meme” is an excellent place to start. By choosing 7 random facts, you are starting the documenting process. You can have several “tagging” sessions and add more and more random facts, as you are coming up with them. The first set of random facts would naturally be the most memorable and maybe most defining and you can go on from there.

So, for this week’s journaling prompt I challenge you to start documenting your life’s story by picking 7 random facts about yourself and writing them down.

Here are seven random facts about me:

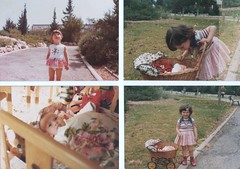
  1. When I was a baby I was abducted from the supermarket (and was found shortly afterward). A crazy, childless, woman just grabbed my stroller and ran outside the supermarket, while my mom was picking up vegetables 🙂 I guess I was a cute baby 😉
  2. I have just celebrated my 28th birthday in Barcelona (I was born in 20.Oct.1980).
  3. As a lawyer I used to spend every free lunchtime I had (with no meetings or other obligations) reading scrapbooking and writing blogs and buying supplies I had never had the time to use.
  4. I have an addiction problem. I do not drink, do not smoke and never did/do/will do drugs – BUT I am addicted to Pringles. I am especially addicted to “Rice Infusion Sweet BBQ”. Yikes. (Any tips for a quick withdrawal, anyone?!?)
  5. I cannot hide resentment (particularly when someone lies to me), however, I have no idea how to cut myself off from a negative/harmful/annoying friend.
  6. I used to believe in magic and fairies. I especially remember a story my sister used to tell me about a magical typewriter that fulfills all your wishes, when you type the words ‘I wish’ in it. I used to spend a lot of time looking after the secret recess in the wall in which the secret typewriter is hidden…
  7. I have an obsessive compulsive need to wash my hand after touching a mop or a bin lid… (and I can’t stand when people are throwing the cleaning cloth in the sink after they are done. Arghhh.)

Share –

Tell me 7 random things about you, I’m curious 🙂

More memes on Creativity Prompt:

If you liked this post subscribe to my feed:

Failure Is Success (at the risk of sounding Ing-Soc)

Tuesday, October 21st, 2008

Inspiration I have recently posted a couple posts about dealing with failure.

In the first post I was preparing the ground by asking you to take some time and concentrate on what you grasp as “failure”.

Then I tried to change the way you think about ‘failure’ and embrace it into your life.

I wish to accept and expect failure in my life. I wish to embrace it as an integral part of my learning curve. I wish to understand that success is a process, which is paved by failures.

Today I have stumbled upon a great quote which wraps up that idea:

“We learn wisdom from failure much more than from success. We often discover what will do, by finding out what will not do; and probably he who never made a mistake never made a discovery.”
By: Samuel Smiles

Do you want to embrace failure in your life too? Share your thoughts by commenting on this post.

For anyone who wonders what Ing-Soc is, I am referring you to “Nineteen Eighty-Four” by: George Orwell – one of the best books I’ve read, a sure must for your bedside table. For all of you who are familiar with Ing-Soc – this idea of “failure is success” has nothing to do with the distorted regime Orwell described in his brilliant book.

Reblog this post [with Zemanta]

Inspiration Prompt #22 – A Different Outlook On Failure

Monday, October 20th, 2008
Description unavailable
Image by Daniele Butera via Flickr

Failure is tough. It is frustrating and discouraging, yet dealing with failure is an inherent part of our lives.

Saying that, I know that most people (myself included) think they must always get everything right on the first try. We do not leave much room for failure and for second and third trials (etc). Many times this perfectionism point of view gets us so discouraged that we stop trying.

This is not the way to go about it. Failure is a natural thing and a learning tool. It only means you should give it another try. Analyze it and see what you can improve and learn from your past mistakes or just do whatever you need to do, over and over again – until you get it right. Just like a child learning to ride his bikes. At first, he falls once or twice but then he gets the hang of it and finds his balance and ride like he’s been doing that from the day he was born.

We should do the same. (Today is my birthday, which is a good opportunity for adopting new and more positive outlooks)

Prof. Randy Pausch,of blessed memory (Sadly, this incredible person has passed away in July), had put it very nicely:

“The brick walls are not there to keep us out. The brick walls are there to give us a chance to show how badly we want something. Because the brick walls are there to stop the people who don’t want it badly enough. They’re there to stop the other people.”

Many best selling authors had been rejected time and again. Many renowned artists have suffered a great deal of dismissal and criticism before making their first masterpiece (some became famous only postmortem). Moreover, even those masterpieces and best selling books were not created in one continuous brush stroke or in one writing session. They are based on numerous drafts and sketches, additions and subtractions – they are a result of a long and sometimes tedious process.

Today I am calling you to change the way you look at failure. I am calling you to look past the brick wall and use them as building blocks.

Share your thoughts with me and leave a comment. I’d love to hear what you have to say about this idea.

Reblog this post [with Zemanta]

Creativity Prompt #21 – Making An Accordion Spine Album

Friday, October 17th, 2008

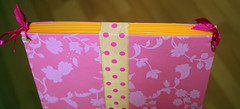
Accordion Spine Album

I love making my own albums and journals. Many times I use recycled materials along with some yummy patterned paper. If you are new to Creativity Prompt, you are welcome to have a look at the different album and journal tutorials I have posted so far:

Album Tutorials –

  1. Circular mini album.
  2. Guided album.
  3. Recycled mini album.
  4. Mini acrylic album.
  5. Circular Pocket album.
  6. Mini chipboard album.

Journal Tutorials –

  1. Hardbound journal. This journal acts as a base for any hardbound album or journal that I am doing.
  2. Matchbox journal.
  3. Tiny hardbound journal.

Now lets get to business and make an accordion spine album – just another fun way of keeping your heartfelt memories.

Materials & Tools –

How To –

  1. First cut the cover of the album out of your chipboard. You will need to cut 2 pieces, 7″ by 7″ each.

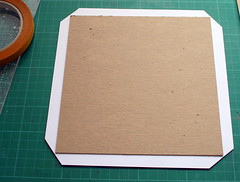
    Cutting the cover

  2. Next you need to cover each of the chipboard pieces with patterned paper.
    • Cut the patterned paper at 8.5″ by 8.5″.
    • Adhere the chipboard piece to the middle of the patterned paper with your glue stick.
    • Cut the corners of the patterned paper up to 1/8″ of the chipboard corners.
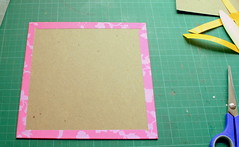
      Cutting the corners of the patterned paper
    • Adhere the edges of the patterned paper to the chipboard (you can use either the glue stick or a double sided tape). For crisp lines, use a bone folder and work each time with the flaps on the opposite sides.
      Covering the chipboard
  3. To finish up the cover’s look, adhere a 6¾” by 6¾” piece of cardstock on each of the chipboard pieces.
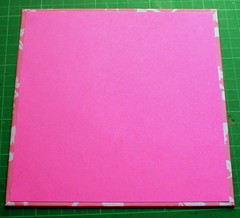
    Covering the inner side of the chipboard cover
  4. Now it’s time to add on the ribbon. Position your chipboard covers one next to another with a gap (1″) between them. Put a strip of very strong double sided tape along the midsection of each chipboard piece and adhere the ribbon to it. Keep enough excess of the ribbon on each side for tying it nicely in a bow. Learning from my on experience, I suggest not to use a wire rimmed ribbon.
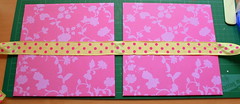
    Adhering the ribbon
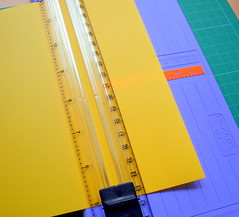
  5. For the spine you need a 10½” by 7″ piece of cardstock. Score it along the 10½” side at every ½”.

    Scoring the spine

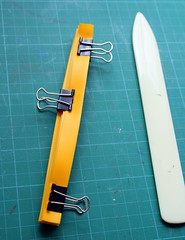
  6. Next you need to fold the cardstock on each score line in an accordion style – one fold up and one down. It is important to burnish each fold thoroughly with the bone folder. When you finish up folding the entire strip of cardstock, secure the spine with paper clips. If you have the time – let it rest like that for at least a day or so.

    Folding the spine

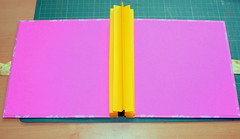
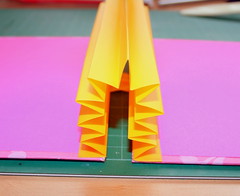
  7. Adhere the spine to the chipboard cover, in a way that creates a mountain fold between the cover and the spine and the other cover (which means the score line is turning outwards). I used a double sided tape for adhering the spine.

    Adhering the spine to the cover
    Closer look at the adhered spine

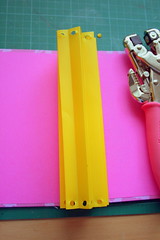
  8. To control the accordion spine, which tends to get a bit unruly… use your crop-a-dile to punch a hole all the way through it, both at the top and at the bottom of the spine.
    Make sure that you leave enough room for the album’s inserts to fit inside.
    It’s hard for the regular crop-a-dile to go through the spine and the two chipboard covers. So either use a craft drill (don’t forget to protect your cutting mat, when using the craft drill) or punch the spine and secure it with a ribbon before adhering the spine to the cover (that means doing steps 8-9 before step 7).
    Punching holes to secure the spine
  9. Secure the spine by threading a ribbon or a strong thread through the holes and tying it in a knot on each side.

    securing the spine

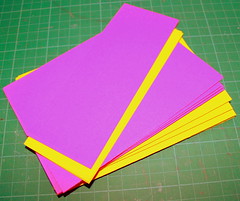
  10. Cut all your inserts from cardstock at 6¾” by 6¾” (and keep the leftovers for fast card making 🙂 ). I have used 9 inserts in two different colors – you can use as many colors as you wish or make it monochromatic.

    Cutting inserts

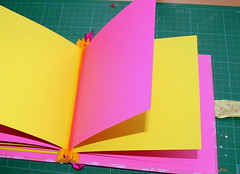
  11. Attach each insert to the spine by lining its edge with double sided tape and adhering it to the inside fold.

    Adhering the inserts to the spine

Share –

I really hope you’ve enjoyed this tutorial (along with all the others) and that the instructions are clear enough for you to go right into making your own mini album. If not, please feel free to ask any question by leaving a comment.

Please share your creation with us by posting a link as a comment here or by adding a picture to the Creativity Prompt Flickr Group.

Enjoy!!!

Journaling Prompt #21 – Failure

Wednesday, October 15th, 2008
En la orillita...
Image by MariClick via Flickr

This week’s journaling prompt is an exercise in self reflection that prepares the ground for next week’s Inspiration prompt – so stay put and make sure to come back on Monday, October 20th

Failure is a natural and integral part of our lives. Failure is an intrinsic part of learning a new skill or mastery. We try and we fail. Sometimes we try again and sometimes we are so discouraged from our failure that we stop and move over to the next challenge, or stop and fret about it…

For this week’s journaling prompt I want you to set aside at least half and hour and reflect about what you consider as your failures in life –

  • List 3-5 things you are considering as your personal failure.
  • Why do you consider these things as failures?
  • What do you think is the cause of these failures?
  • Do you consider those things as a small or a big failure?
  • What have you learned from these failures?
  • Have you given one of your challenges a second try after failing at it?
    • If so – what happened after the second (third, fourth, etc.) trial?
    • If not- why haven’t you tried again? What stopped you?

Share –

I know it is a difficult and a very personal subject, but if you wish to share your thoughts about it, I’d love to hear what you have in mind, so leave a comment.

The winner is…

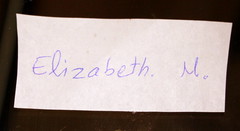
The winner of the book: Visual Chronicles by Linda Woods and Karen Dinino is:

.

Her comment was:

I am celebrating the new year by reflecting back on the joys of being a mother and seeing the rewards as my children launch their independent lives. It’s my first year as an empty nester and as painful as it is, I know I’ve done my job and that my children’s success away from me is a true blessing.

Congratulations, Elizabeth. Please send me your address so I can send you the book. (I’m sorry but If I don’t get your address by Wednesday, 22nd October (2008) – I’ll have to choose another random winner – so make sure to send it ASAP 🙂 .)

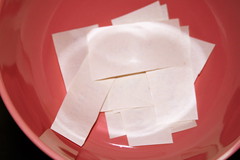
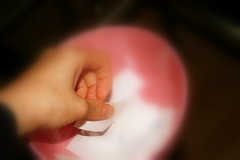
The process of choosing a winner was very high tech, as you can see for yourself:

If you liked this post subscribe to my feed:

Inspiration Prompt #21 – The Value Of The Everyday

Monday, October 13th, 2008

groundsel

“Make each day your masterpiece. “

John Wooden

We are grown to acknowledge the “Monday’s gloom” and its brother “TGIF” (thanks god it’s Friday). I resent those ideas as both are causing us to fast forward and actually live only 2 days out of every week. We are living from one weekend to another.

I’ll repeat (for the sake of stressing this point as much as possible), we are growing accustomed to living every 5 days in anticipation for the last two days of the week. Waiting – 5 & Enjoying – 2. Why would we do such thing to ourselves? Why would we accept notions that are basically nullifying 5/7th of our lives?!?

I have lived like that for several years. I was waiting for the weekend from the very first day of the work week, living aimlessly for 5 days only for the following two, but no more.

Why shouldn’t we enjoy EACH day to the fullest. Live each day as if it is a masterpiece… Live each day purposefully.

I hereby invite you to dismiss the Monday’s gloom. Instead I offer you to wake up each day with joy and excitement and a purpose in your hearts. I invite you to make each of your days – 7/7 – a masterpiece.

Would you join me? Leave a comment and share your thoughts with me.

Psst… You have only a couple days left for a chance to win a copy of the book: Visual Chronicles by Linda Woods and Karen Dinino.

Enter the giveaway by leaving a comment here. Just follow the instructions and secure your place at the raffle.

Reblog this post [with Zemanta]

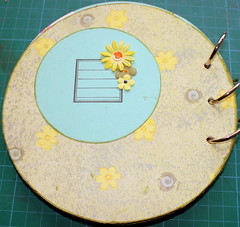
Creativity Prompt #20 – How To Make A Circular Mini-Album

Friday, October 10th, 2008

Circular Mini-Album

I love making my own mini-albums. The handmade album is unique and filled with love and attention.

By definition, the handmade album is going to be a “one-of-a-kind”, even if you make a hundred of them – because as long as it is not mass produced by machines it is going to turn up a wee-bit different each time you make it.

Apart from the handmade album’s singularity, there are two more things that make me happy about making my own mini-albums:

  1. Recycling. By making my own albums (and journals) I get to reuse stuff that otherwise would go to the bin and clutter the world… I can recycle boxes, notepads covers, chipboard which is used for flattening shirts and linens in their packaging. I get to literally turn trash into treasure, and I LOVE it.
  2. Flexibility. When I am making something from scratch I am the one setting up the rules. I decide what shape it’ll be (or that it is going to be made out of multiple shapes). I decide what size is it going to be (or multiple sizes – to fit my own personal needs). I decide which materials I am going to use (hence the opportunity to recycle). I am the boss 🙂

In this week’s creativity prompt, I am calling you to use your flexibility and create a circular mini-album for yourself or as a gift for a loved one.

Tools –

Materials –

(for embellishing your album you can use whatever you have in your stash – patterned paper, paper flowers, buttons, glitter, ribbon etc. The sky is the limit when it comes to embellishments. You can be creative and do some recycling for creating your embellishments as well…)

Instructions –

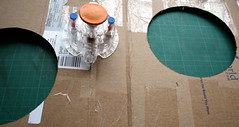
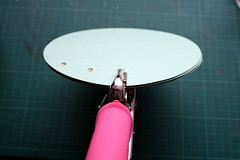
  1. Start by making the album’s cover. Cut 2 circles from a cardboard box (mine are 6″ in diameter). Because of the thickness of the cardboard, the circle cutter won’t go all the way through, but it’ll help you in creating a nice groove that you can follow cut all the way through with either the utility scissors (very sharp) or the craft knife.

    Cutting the cover

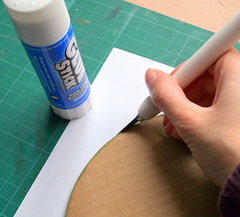
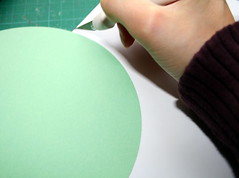
  2. Next you need to cover the cardboard circles with patterned paper. Apply a generous amount of glue with your glue stick and stick each of the cardboard circles to a sheet of patterned paper. Then flip it over and cut the excess of the paper with either the utility scissors or your craft knife (what ever works better for you).

    Covering

    Alternatives: you can paint the cardboard with acrylic paints and a sponge brush or cover it with modge-podge or leave it as it is for a natural-recycled look.

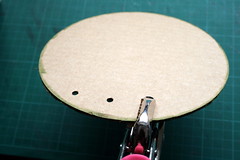
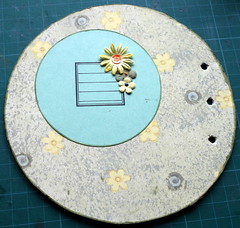
  3. Punch the holes for your album with the trusty Crop-a-Dile. Make sure your hole is no farther than a ¼” from the edge, otherwise the pages of the album won’t turn easily (I’m speaking from my own experience here… You can see that in the picture below).

    punching album's holes

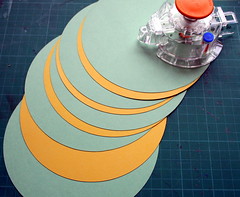
  4. Cut the insert circles from your cardstock, using the circle scissors again. You can cut them a little bit smaller than the covers. You may use multiple colors of cardstock to make it more interesting visually.

    Cutting inside inserts

  5. Next punch the holes in your inserts. Use your punched covers as a guide and trace the holes lightly with a pencil. Using the Crop-a-dile, you can punch all your pages at ones to make it quicker and to insure even lining. (Don’t forget the ¼” rule from step 3 above!!!)

    Punching holes in the inserts

  6. It’s time for the fun part – embellish!!! You can cut any excess by flipping the circle over and use your utility scissors or craft knife.

    embellishing

    cutting excess

  7. When all your album pages are done, thread them through with the loose leaf rings (you can also use ribbon or thread as an alternative binding method).

Share –

I would love to see your own interpretation to the circular mini-album.

Share you creations by leaving a link in the comment section below or by adding the pictures to the Flickr’s Creativity Prompt group pool.

Feel free to share your thoughts about this project. I’d love to hear what you think about it.

Psst… You have got less than a week for a chance to win a copy of the book: Visual Chronicles by Linda Woods and Karen Dinino.

Enter the giveaway by leaving a comment here. Just follow the instructions and secure your place at the raffle.

Journaling Prompt #20 – Write A 25-Words Poem About Connecting

Wednesday, October 8th, 2008
Won't know when
Image by Jon Jacobsen via Flickr

This is a lovely project initiated by Liz Strauss which I have stumbled upon on Amy’s blog.

Memes are a great way to dissolve a writer’s block. The rules and the structure of the meme act as a guide. It shows you the way that crosses the block and helps you create something new. Usually after you have created something – from start to finish – the dam is breached and an avalanche of ideas comes through.

Try that, it’s exhilarating.

Going back to this meme’s subject – “Connecting” – it is a great subject to dwell upon by itself, whether you are tackling a writer’s block or not or whether you are into memes at all.

The rules are: (As stipulated on Liz’s initial blog post)

  1. Think about connections, connectedness, being linked together, synchronicity, serendipity, community, oneness.
  2. Write a sentence about it.
  3. Count the words you have written.
  4. Edit the sentence until you have 25 words exactly. Notice how your idea changes as you edit and how your feelings change with each rewrite.
  5. Add a picture if you can.
  6. Post your 25 words on your blog by October 16th.
  7. Link back to Liz’s post.

My 25-words:

When you are far away
and out of my reach,
I know we breathe the same air
and watch the same sky;
I’m happy again.

Share –

I will be happy to read your 25-words.

Either link to your blog or write your 25-words at the comment section below.

I am also interested in your thoughts about “Connecting” in general.

Psst… You have one more week for a chance to win a copy of the book: Visual Chronicles by Linda Woods and Karen Dinino.

Enter the giveaway by leaving a comment here. Just follow the instructions and secure your place at the raffle.

If you liked this post subscribe to my feed:

Inspiration Prompt #20 – The Canvas Of Life

Monday, October 6th, 2008
A palette of watercolours and a brush.
Image via Wikipedia

Life in itself is an empty canvas,
it becomes whatsoever you paint on it.
You can paint misery, you can paint bliss.
This freedom is your glory.
Osho

I am still on a new-year-new-beginnings state of mind and what can be a better paradigm for the year than the canvas of life.

Each year we are gifted with a blank canvas on which we can paint in any way we choose to paint. We can use a large variety of mediums and tools – but moreover, we have the power to refrain from using some colors, shades and tones that do not do our life-art any good.

Our life is what we make of it. Our picture is what we choose to paint on our canvas. It depends on our rough sketch, our color-palette and the box of tools we choose to take along with us. Provided that we have taken the right tools and paints, our rough sketch will be taken over by more and more confident brush strokes.

This Wednesday is the Jewish “Day of Atonement”. (Yom-Kippur) On this day we are supposed to look deep into ourselves, beyond our material needs (such as food, water and bathing) and prepare an “analysis of the soul“.

This is the perfect opportunity for me to draw my rough sketch on the canvas of life.

Needless to say, this notion is open for every soul in the world and observing Judaism (or Yom-Kippur) is irrelevant (Hey, it’s a notion suggested by Osho…). The proximity to the holiday just puts me in a reflective state of mind which brings me to write about it right now. That’s it.

share-

  • What would you like to draw on your canvas of life?
  • What colors and tools would you like to use?
  • What colors and tools would you like to steer clear of?

Leave a comment with your answers and thoughts.

Vote of Confidence –

I am bringing my heart and soul to this blog. I have done that from the very first day. Therefore, it’s always nice to know the blog is appreciated by my readers. This vote of confidence is rejuvenating and gives me an enormous boost of motivation.

Therefore I would like to take note of several affirmations I have received last week:

Thank you all – your positive feedback is much appreciated.

Feedback is also extremely important when it contains constructive criticism, so I can improve and make this blog even more fabulous.

So remember, I am always pleased to hear from you guys!!! Whatever you have to say.

Psst… You have a chance to win a copy of the book: Visual Chronicles by Linda Woods and Karen Dinino.

Enter the giveaway by leaving a comment here. Just follow the instructions and secure your place at the raffle.

Reblog this post [with Zemanta]