/** Font types */

Author Archive

Journaling Prompt – How Do You Tackle Everyday Chores?

Thursday, December 10th, 2009

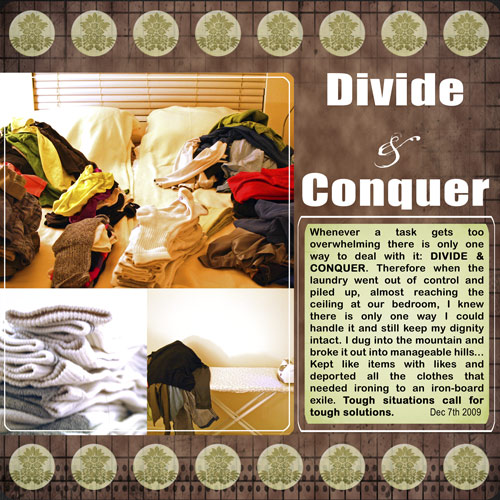
How Do You Tackle Everyday Chores? Divide and conquer

[Digital products used: Fonts: Impact, Porcelain, Arial Rounded; Digital Kits: Shimelle Laine’s: Long and winding road and Starburst solids.]

Everyday chores – everyone has them and every person handles them differently.

Some hire help (which is what I used to do while I was working as a lawyer).

Some ignore them altogether until reality knocks on their heads (Been there. Done that).

Some tend to their household chores as a second nature (This is Martha Stewart’s group, if you’re intrigued…).

Some approach their chores in a declaration of war – I am on that group and I have a very rigid policy on the subject matter: Divide & Conquer!

Share

How do you tackle your daily chores? Leave a comment and share your trusted methods.

Make Your Own Planner Workshop
Do you have last minute gift giving challenges?

Check out the new “Make Your Own Planner” workshop and you may solve them…

Journaling Prompt – New Year’s Resolutions Series – Step 2: Contemplate

Wednesday, December 9th, 2009
New Year's Resolution
[Photo by: Keven Law]

I love making lists. I make a lot of lists. Perhaps too many lists. Okay, I make way too many list.

However, a list of resolutions isn’t like any other list. It’s a special list, thus requires a special process ensuring each and every item belongs there and is feasible.

Therefore I am posting this special “New Years Resolutions Series”, to provide a surefire system to compile a successful New Year resolutions list.

Step 1

Reminisce.

Step 2

In this week’s prompt we are going to reflect on the memories we have gathered last week and contemplate.

Go over your notes or list from last week and write down under each resolution or dream:

  1. What had helped you to meet your resolutions in the past/last year?
  2. What had prevented you from fulfilling your wishes in the past/last year?
  3. What do realized resolutions have in common?
  4. What do unsatisfied resolutions have in common?

As you reflect you may come up with some new understandings and self revelations – write them down as well.

Step 3

List.

Step 4

Choose.

Share

What new understandings and self revelations have you come up with? Share your process by leaving a comment on this post. I love to discuss prompts with you!

Make Your Own Planner Workshop
Do you have last minute gift giving challenges?

Check out the new “Make Your Own Planner” workshop and you may solve them…

Creativity Prompt – A Simple Stitched Notebook

Friday, December 4th, 2009

Simple Stitched Notebook

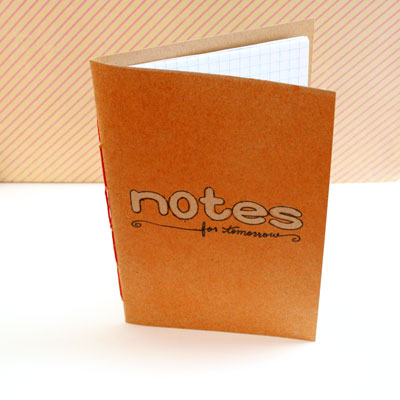
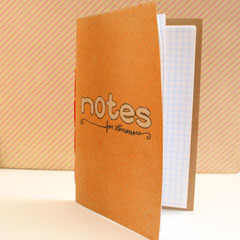
This week I have a cool project – super duper simple and the results are fabulous. For a no bulk notebook that you can carry around freely, without worrying about wear & tear, I have a cool masking technique for you with a color spray and some chipboard letters.

I also have a fantastic tip for threading your embroidery floss through the needle in a split second, you wouldn’t want to miss that… 🙂

Tools & Supply

How To


[Watch on You Tube. Please rate & comment.]

Step-by-Step Instructions

  1. Cut your papers and cardstock to size & fold in half. Burnish the crease with a bone folder.
  2. Lay the paper stack over the cardstock piece and center it.
  3. Mark the placement of your piercing holes. Find the center and mark at ½” on each side and then go on and mark in 1″ increments.
  4. Pierce all your marked holes, all the way through the papers and the cardstock. Make sure they are aligned together and that the piercer goes through the crease.
  5. Thread your needle with the embroidery floss. TIP – To thread your needle in a split second (no exaggeration here) simply stick a small piece of tape to the end of your floss, fold it over and cut the excess. That will prevent the fraying of the floss and will also provide a slight stiffening effect for a quick and smooth threading.
  6. Start stitching your notebook from the top hole, from the inside – out. Make a simple running stitch, going through each hole – once in and once out. After you go through all the holes, go back through the holes, switching direction, so the stitch will look like a backstitch. When you go through the last hole, tie the ends together in a strong knot.
  7. For a no-bulk embellishment, adhere the chipboard letters with a temporary adhesive. Make sure the adhesive isn’t protruding outside or it will affect the impression of the letters.
  8. Lightly spray from about 10″ above your notebook cover. Spritz the color mist as many times you want until you get the effect you are looking for. [The chipboard letters may be reused in another project, by the way…]
  9. Before removing the letters go over them with a black or white marker, that will create a nice outline and will add visual interest. Just make sure to hold your letters tight, as the temporary adhesive isn’t strong enough and they may move around.

Simple Stitched NotebookSimple Stitched Notebook

Share

If you have any question, suggestion or remark – don’t hesitate to contact me – either leave a comment here, use the contact form or start a new thread on the Creativity Prompt Flickr Group!!!

I would also be very happy to see your own creations, so don’t be shy and share 🙂

Make Your Own Planner Workshop
Check out the new “Make Your Own Planner” workshop and you may solve this year’s holiday gift shopping problem. An affordable workshop that keeps on giving…


Make Your Own Planner Workshop
“Capture Your Dream” workshop is relaunching as a self-paced workshop. Isn’t this the perfect time for you to capture your dream and make it happen?

Cards. Cards. Cards.

Thursday, December 3rd, 2009

This week I was determined to dig deep into my stash and make stuff with forgotten products, side by side with some new products and toys I bought lately. Mix old with the new and get into the holidays’ spirit…

Card
Old: Chatterbox patterned paper, Scalloped circle punch, ink: Palette hybrid in Pure Poppy and vintage Cream by Papertrey Ink.

New: American Crafts cardstock, Bazzill kraft cardstock, Apron Lace border punch by Fiskars, Stamps: Papertrey Ink “Retro Basic Backgrounds”, Ali Edwards “You” for Technique Tuesday, Glitz Design “distress 2”.

Techniques: 1. The striped paper was cut diagonally for a diagonal design. 2. For the flower I punched a gazillion scalloped circles (ok, just 10) and attached them together with a brad. Then I crumpled each layer to create a super-dimensional flower.
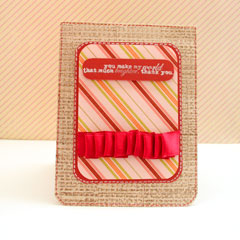
Card
Old: Chatterbox patterned paper, wire rimmed ribbon, ink: Palette hybrid in Dark Chocolate and vintage Cream by Papertrey Ink, red felt marker, white gel pen.

New: American Crafts cardstock, Bazzill kraft cardstock, Corner Chomper, stamps: Ali Edwards “You” for Technique Tuesday, Glitz Design “distress 2”.

Techniques: 1. I pleated the ribbon, the wire rim helps it stay put. Then I took a strip of a strong double-sided adhesive and attached it to the cardstock and adhered the pleated ribbon to it. 2. For the layered, distressed background, I first stamped a generic houndstooth pattern in a cream colored ink, let it dry and then stamped a text pattern with brown ink over it.

Card
Old: Cream card, red-brown thread, Palette hybrid ink in Pure Poppy by Papertrey Ink, Kaiser Craft’s clear rhinestones, Fiskars 2″ circle squeeze punch.

New: Brother LS2125I Sewing Machine, American Crafts cardstock, Stamp: Papertrey Ink “Mixed Messages”.

Techniques: This is my first trial ever at sewing, so I’m pretty proud of the semi-straight border 🙂 1. The border is sewn with a zig-zag stitch. 2. the circle was punched with a 2″ circle punch and adhered to the card with temporary adhesive. Then I sewed freely inside and around the circle to create a rose-like abstract pattern. I also made one run with no thread, for a dotted-punctured effect.

Share

Have you been hoarding products that has been collecting dust in the back of the shelf? Have you used your scraps/old supply lately? What have you been doing? Have you been experimenting with a new toy or technique? Share! I love a good discussion 🙂

Make Your Own Planner Workshop
“Capture Your Dream” workshop is relaunching as a self-paced workshop. Isn’t this the perfect time for you to capture your dream and make it happen?

Make Your Own Planner Workshop
Check out the new “Make Your Own Planner” workshop and you may solve this year’s holiday gift shopping problem. An affordable workshop that keeps on giving…

Journaling Prompt – New Year’s Resolutions Series – Step 1: Reminisce

Wednesday, December 2nd, 2009
New Year's Resolution
[Photo by: Kat]

December means celebrations, holidays and elevated spirits but it also means the year’s end. If we plan in advance we are already thinking about next year’s resolutions.

Last year I posted a special New Year’s Resolutions Series on Creativity Prompt – offering three different ways to come up with your new year’s resolutions: the traditional way, the clairvoyant way and the action based way.

This year I am posting another series, concentrating on how to choose the best new year’s resolutions.

Step 1

The system includes 4 steps and the first step is to reminisce.

For this step you may go back in time as far as you wish. Either look solely at 2009 or look at the past 5 years, 10 years, 25 years or even look back at your childhood years.

Review your past year or years and take notes. Write down lesson learned, missions accomplished, dreams fulfilled, goals met, etc.

At this stage all you have to do is bring up memories. Don’t analyze. Certainly do not criticize. Don’t replicate goals. Just write down what you remember – resolution-wise – from years past.

Step 2

Contemplate.

Step 3

List.

Step 4

Choose.

Share

Are you a resolution person? Have you conformed to your past years’ resolutions? Share by leaving a comment on this post. I love discussions!

Make Your Own Planner Workshop
Check out the new “Make Your Own Planner” workshop and get the perfect last minute holiday gift. An affordable workshop that keeps on giving with an unlimited personal use license.


Make Your Own Planner Workshop
“Capture Your Dream” workshop is relaunching as a self-paced workshop. Isn’t this the perfect time for you to capture your dream and make it happen?
Inspiration Prompt – List Your Wins As They Happen

Monday, November 30th, 2009
List Your Wins
[Photo by: Crystal]

Optimism and positivity are priceless. A person that can always see the glass half full is a happy person.

Many times the ability to find the pro in every con is retrospective.

Only after the fact, after the initial burst of anger and frustration, we are able to take a step back, relax, reexamine the situation and realize it’s all for the best, and it is perfectly OKAY.

However, it is the ability to stay optimist in real time that really improves our quality of life and keeps us happier and more content in general.

“Being negative is easy. There will always be a downside to everything good, a hurdle to everything desirable, a con to every pro. The real courage is in finding the good in what you have, the opportunities in every hurdle, the pros in every con.”
Carolyn Hax

Try to change the way you look at things, to change your perspective and always see the positive in any given situation. Start today and try to make it work in real time by listing your wins. Find all the half full glasses in your day and list them as they are served to you…

If this exercise succeeds, make it a habit!

Share

What were your wins today? Share by leaving a comment on this post!

Make Your Own Planner Workshop
“Capture Your Dream” workshop is relaunching as a self-paced workshop. Isn’t this the perfect time for you to capture your dream and make it happen?

Make Your Own Planner Workshop
Check out the new “Make Your Own Planner” workshop and you may solve this year’s holiday gift shopping problem. An affordable workshop that keeps on giving…

For This I Am Thankful…

Thursday, November 26th, 2009

I am dedicating this post to you, my dear readers. I am grateful for you!

I am thankful for you following my blog.

I am thankful for you leaving heartfelt comments and messages – encouraging me and sharing your stories, your thoughts and sometimes even your struggles.

I am thankful for you spreading out the word through your personal blogs, Twitter and Facebook and sharing posts and ideas you like with your friends and followers.

I am thankful for your patience on weeks in which life happens.

I am thankful for your participation in my workshops and the lovely feedback you are leaving and warming my heart with.

I am thankful for your support in Creativity Prompt via buying the products you need through the links I provide.

I am thankful for you!

Thank you so much!

As a token of my appreciation I am giving you two printable files with labels and journaling tags (you can punch out the tags with a 2″ circle punch):

  1. Lables
  2. Circular Journaling Tags

[To download the files: either click on the links above OR right-click and opt for “Save Target as…” or “Save Link as…”; Print with no scaling on a letter-size cardstock or sticker sheet]

Photoshop Elements Tip – Adding A Hand Drawn Element

Here is how I added the hand-drawn flowers to my tags:

  1. Draw your elements with a black marker on a plain white paper.
  2. Scan your element in high resolution.
  3. Open the scanned file in Photoshop Elements.
  4. Press Ctrl+L or Command+L and tweak your levels, so the white is bright white and the black is pitch black.
  5. You can also use the eye-drop tool on the Levels Menu.
  6. Open a new layer beneath your scanned elements.
  7. With the Quick Selection tool select all the white areas and press Delete. Make sure you are working on the scanned elements’ layer. The checkerboard pattern means this part is transparent.
  8. Save the file as a PNG file – that will keep the transparency attributes.
  9. With the rectangle selection tool select the element you want to use and then press on the Move tool.
  10. Open the file you wish to insert the hand drawn element to, drag and drop your hand drawn element into the file you have just opened. Re-size as needed.

Happy Thanksgiving!

[Due to the holiday – and my limited access to my husband’s MAC… – there will not be a Creativity Prompt this week, but I have included the tutorial above, enjoy! 🙂 ]

Make Your Own Planner Workshop
“Capture Your Dream” workshop is relaunching as a self-paced workshop. Isn’t it the perfect time for you to capture your dream and make it happen?


Make Your Own Planner Workshop
Check out the new “Make Your Own Planner” workshop and you may solve this year’s holiday gift shopping problem. An affordable workshop that keeps on giving…

Journaling Prompt – Concentrate Your Thanks Giving On One Person Or One Thing

Wednesday, November 25th, 2009

Concentrate Your Thanks Giving On One PersonI have a million things to be thankful for. My family. My friends. My health. My readers. My life style. My adventures. My education. My opportunities. My dream coming true. I have so many things to be grateful for that I don’t even know where to begin.

Each item I add to the list brings happiness and joy and warms my heart. Names come up and places I have been at. Delicatessens I have tried. Sweet memories.

The thing is that when I try to come up with a list so many things flood my brain and my heart at the same time. Smile after smile, and at times – some tears, accompany all the great things I appreciate having or having had in my life this year and in general.

It’s a good thing. Don’t get me wrong. I am GRATEFUL.

But I want to give each item on my list the attention it deserves. So no list for me this year. I am trying to concentrate on one thing I am most grateful for.

Without further ado, if you are with me on that, concentrate on one person or one thing you are most thankful for this year and write down why.

Nadav, my dear husband.

I love you so much. You have been the light of my life.

You make me laugh. Constantly. Even when I’m blue or sick – you can always crack me up.

You make me think. You make me rethink and then think some more. You make me try harder.

You make me aspire higher. You make me better.

You motivate and inspire me. You make me believe in myself and you remind me time an again of accomplishments I have long forgotten.

You make the day brighter and the night more magical. Thanks to you I wake up with a big smile every morning.

I am so happy to have you in my life, Nadavi.

This year I am most thankful to have you!

Share

Who or what are you most thankful for this year? Share your gratitude by leaving a comment on this post.

Make Your Own Planner Workshop
“Capture Your Dream” workshop is relaunching as a self-paced workshop. Isn’t it the perfect time for you to capture your dream and make it happen?


Make Your Own Planner Workshop
Check out the new “Make Your Own Planner” workshop and you may solve this year’s holiday gift shopping problem. An affordable workshop that keeps on giving…

Things I have Been Up To Lately…

Tuesday, November 24th, 2009

I want to share with you some things I have been up to lately.

  1. Make Your Own Planner WorkshopRelaunching. After receiving many requests from my readers I have finally set up a self-paced version of the popular workshop “Capture Your Dream“. That means that you can take the workshop at any time and start instantly. But isn’t this time of year the perfect time to make your biggest dream come true? I think so too.
  2. Creating. I have been busy making stuff, which means I have been busy being way too happy 🙂 “Making Stuff” and “Happy” are synonyms in my book.

    I have been scrapooking:

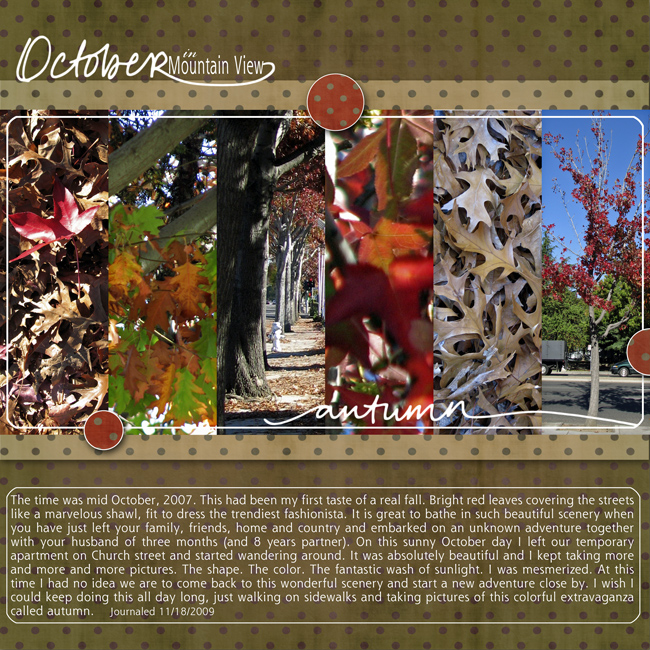
    Autumn in Mountain view Digital Layout

    [Supply: Penned Words: Autumn By Shimelle Laine; Autumn Apples Polka Dot Papers by Shimelle Laine]

    and I have been making cards:

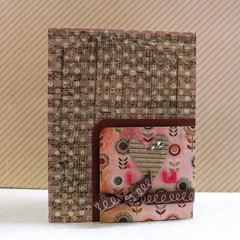
    handmade cardshandmade cards

    [Supply: Bazzill Kraft cardstock, Basic Grey patterned paper, Hero Arts Heart Winged Butterfly, Artistic Windows & Woodgrain Pattern; Glitz Designs Distress Kit 2 stamp set; Papertrey Ink Polka Dot Basics stamp set; Gems; Ribbon; Crop-a-dile; Eyelets; Corner Chomper; Versamark ink; Clear embossing powder; Heat gun; Rock Candy crackle paint; Pink + Aqua gel pen; Colored pencils; Blender pen; Palette Hybrid ink in Vintage Cream]

Share

What have you been up to lately? Leave a comment and share.

Make Your Own Planner Workshop
Check out the new “Make Your Own Planner” workshop and you may solve this year’s holiday gift shopping problem. An affordable workshop that keeps on giving…

Healthy Kitchen Prompt – Chicken With Pineapple And Vegetables

Monday, November 23rd, 2009

Chicken With Pineapple And Vegetables

I am a part time vegan-vegetarian… That means that every once in a while I eat meat or fish for a boost of iron and other good things.

A rich stew with chicken and vegetables brings me back home to Shabbath lunches with my family. It’s my comfort food and there is no better time to eat comfort food than when the temperatures drop down and a woolly is not enough to keep me warm.

Chicken With Pineapple & Vegetables

4 Servings. 400-450 Calories per serving (depends on the size of the chicken).

Ingredients:

  • 4 chicken drumsticks
  • 8 new potatoes
  • 2 carrots – sliced into large 1½” chunks
  • 10 pearl onions
  • 1 small can of light crushed pineapple
  • 2 Tbs. Cinnamon
  • 2 Tsp. pumpkin spice
  • 1 Tbs. turmeric
  • 1 Tbs. curry powder
  • 1 Tsp. mace
  • ½ Tsp. cloves
  • 2 Tsp. cyan pepper, for an extra kick of spiciness
  • 2 C chicken broth
  • Olive oil spray

How To

  1. Put a Dutch Oven on the stove on high and lightly spray with olive oil.
  2. When the pot heats up – throw in the vegetables and saute for 5 minutes.
  3. Remove the skin from the chicken pieces and add the skinless chicken to the pot – scald each piece on both sides.
  4. Add all the spices in and stir well.
  5. Pour in the content of the pineapple can and fill the empty can with chicken broth and add to the pot.
  6. When the liquid is boiling, turn down the heat to low and cover the pot – Let it cook for 40 minutes.

Serve with a light green salad and bon appétit.

Share

Have you tried this recipe? Are you going to give it a try? Share your thoughts by leaving a comment.

Make Your Own Planner Workshop
Check out the new “Make Your Own Planner” workshop and you may solve this year’s holiday gift shopping problem. An affordable workshop that keeps on giving…