/** Font types */

Author Archive

Happy Announcement: I Am On Karla Dudley’s Creative Team + Small Comforts…

Thursday, March 11th, 2010

Small Comforts

[Karla Dudley Designs: Capture + Record, Silly Lines Green, Rub On Essentials 1 and Alpha Stickers 2; Font: Erika Ormig]

You have probably noticed how much I LOVE Karla Dudley‘s designs. I have been using her gorgeous products in my digital layouts for a long while – they are classically stylish and if a “hard copy” line had been offered, I would probably buy it too…

You can only imagine my delightful surprise when she said she was looking for designers for her CT. I just couldn’t believe my own eyes.

I am beyond happy for making it to the talented CT of the uber talented Karla.

Journaling Prompt

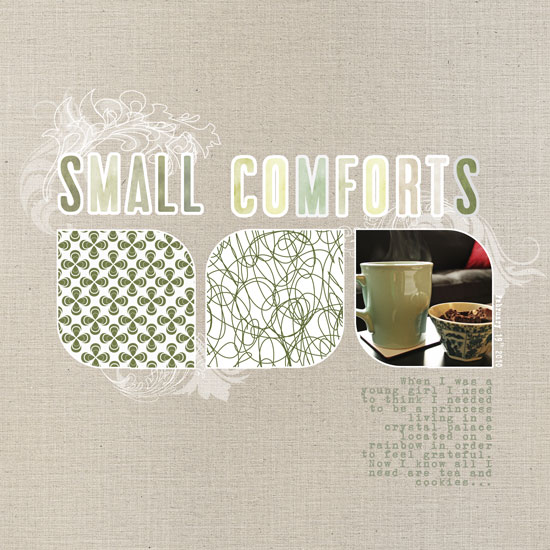
This layout is all about small comforts.

In my journaling I wrote:

When I was a young girl I used to think I needed to be a princess living in a crystal palace located on a rainbow in order to feel grateful. Now I know all I need are tea and cookies.

Like their name suggests small comforts are the little things that make us go “ahhhh…”.
The small things that make us feel serene and happy and thankful.
Jot down what are your small comforts. I assure you that acknowledging them alone would already make you feel this much better.

[Go here for the digital tip on how to create an outline image of your brush or png. image]

Share

What are your small comforts? Leave a comment and share your delights with me. Please… 🙂
I love hearing from you guys.

Stay tuned for some more free journaling labels.

Make Your Own Planner Workshop
Check out Creativity Prompt’s self paced workshop: “Capture Your Dream”. In this workshop you will capture, follow and make your dream come true as well as document your journey in a mixed media mini album.

What Makes You Smile? Journaling Prompt and a Digital Tip

Tuesday, March 9th, 2010

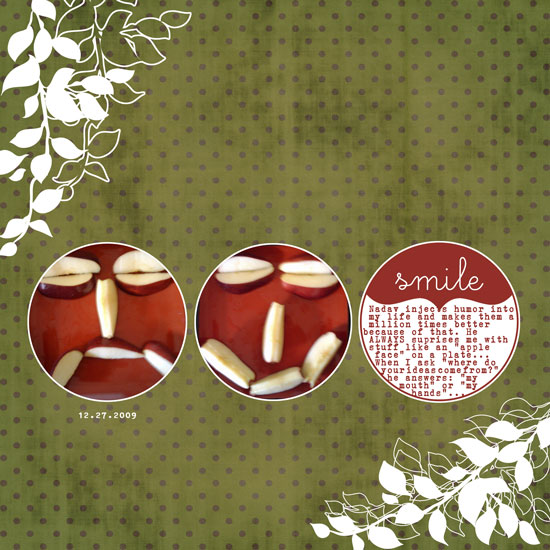
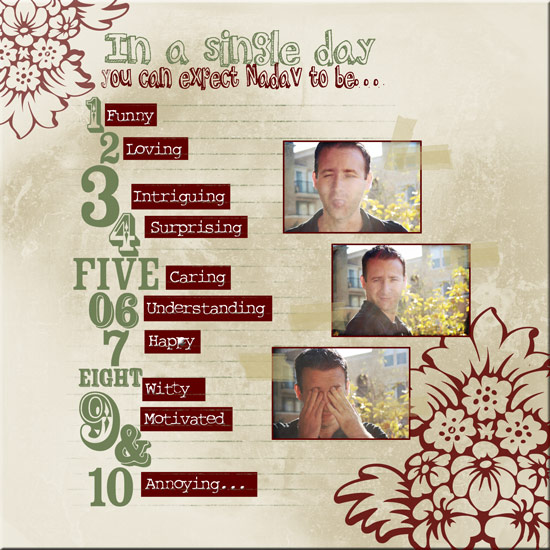
Nadav Makes Me Smile

[Font: Erika Ormig; Digital Kits: Write It Down Cute Circles & Autumn Apples Polka Dot Papers by Shimelle Laine, available at Two Peas in a Bucket + Blakely by Karla Dudley, available at The Digichick Shop]

Smiling is better than make up. It gives you a natural glow and a sparkle in your eyes. It deepens your dimples and covers you with irresistibleness. I am telling you – smiling is way better tan putting on make up.

You may buy make up online, at department stores, drugstores, boutique shops – but where do you get a smile?

What have you that makes you brake out with a glowing smile?
Who brightens your day in a way that curves your lips from deep inside?
What can transform a gray day into a glorious and a happy moment?
Who is able to make you forget everything but your happiness and gratefulness?

I have my Nadav, my husband.

He injects my life with humor and makes it a million times better.
He manages to make me smile and forget I have been angry for an untended chore.
He surprises me, time and again, with the creative ways he finds to make me laugh.
He brightens my day and keeps my plate of gratitude overflowing.

When asked “where did you come up with that?”, he simply answers: “my mouth” or “my hands” – depending whether his current cuteness involves a saying or a deed.

Same goes for the arbitrary day in which he brought me a plate with an “apple face” – mine is smiling and his – sour.

I was surely smiling once I got this plate, but he’s just incapable of being sour 🙂

I love my Nadav.

Digital Tip

Do you want your png. images or brushes in your digital kit do double duty? Then create an outlined image of them.

How To – Adobe Photoshop Elements

  1. Lay your image or brush stroke on a separate layer.
  2. Copy this layer – either right-click on the layer indicator and choose “duplicate layer” or click on the image itself, while pressing the [Alt on a PC] or [OPT on a Mac] button.
  3. Reposition the copied image with the move-tool to where you wish your outline image to be.
  4. Open a new layer above the latter.
  5. Press [CTRL on a PC] or [CMD on a MAC] and click on the image on the left side of the copy layer indicator. That step will automatically select the image’s silhouette.
  6. Make sure your new – top layer – is selected and click on: “Edit” => “Stroke” (use the eye-drop tool to choose the color from the original image) and commit.
  7. Uncheck or delete the copied layer.

Share

What makes you smile? Share by leaving a comment. I LOVE hearing from you. Each comment makes me smile, so please share!

Make Your Own Planner Workshop
Check out Creativity Prompt’s self paced workshop: “Capture Your Dream”. In this workshop you will capture, follow and make your dream come true as well as document your journey in a mixed media mini album.

Scavenging My Scrap Basket – Creativity Prompt

Monday, March 8th, 2010

My scrap basket is a disgrace. I seem to only use it one way – dumping more and more bits and pieces inside. I have scraps of papers from companies that no longer exist… (not that it’s that difficult in our economy, but I am talking about Chatterbox and the like…).

A scrap basket isn’t supposed to act as a burial place for broken 12 by 12 sheets… It is supposed to live symbiotically with the rest of the supply. Complete and enrich each other.

This is not the case, unfortunately.

My total lack of time drives me repeatedly to my stash of paper pads and loose leaf papers because it is easier, fresher, more approachable. Not the most economically and environmentally friendly way of working with papers… I know.

Sometimes I am determined to work with my scraps, and I usually love the result but it doesn’t happen frequently enough.

This weekend I felt like pulling out my scrap basket and see what treasures I can find inside, here is what I made –
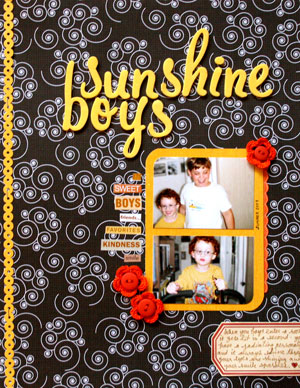
Sunshine Boys Layout
Supply

Patterned papers: Black River, Sassafras, Chatterbox.

Letter stickers: American Crafts, Making Memories.

Embellishments: Paper frills by Doodlebug Designs, buttons by We R Memory Keepers, Crochet flowers – handmade.

Journaling tag: Creativity Prompt.

Tools: Tim Holtz (Tiny Attacher + Scissors), We R Memory Keepers Corner Chomper.
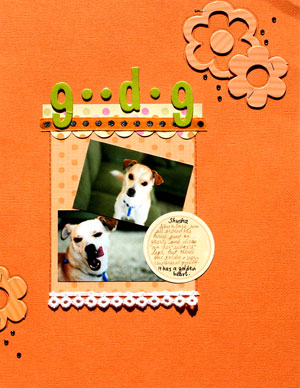
Goodog Layout
Supply

Patterned papers: Black River, KI Memories.

Cardstock & letter stickers: American Crafts.

Embellishments: Ribbon: American craft (orange), Other (lace). Chipboard accents: Making Memories. Jewels: Basic Grey.

Journaling tag: Creativity Prompt.

Tools: Tim Holtz. (I absolutely love the Tiny attacher. I was skeptic at first, but it goes through the chipboard like butter)
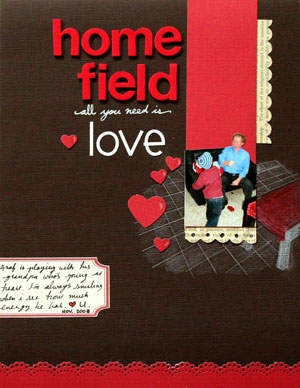
Home Field Layout
Supply

Patterned papers: vintage textbook paper.
Cardstock: Bazzill (dark brown) DCWV (red).

Letter stickers: American Crafts, Doodlebug Designs; White gel pen: Uniball Signo.

Punches: Martha Stewart (Heart + Doily Lace), Fiskars (Threading Water + Scallop Sentiment), Other: Small heart.

Journaling tag: Creativity Prompt (will be posted soon).

Other: colored pencils (Prisma)

Share

Have you been working with your paper scraps lately? What relationship do you have with your scrap basket/ drawer/ tray? Please share and leave a comment.

If you have any question, suggestion or remark – don’t hesitate to contact me – either leave a comment here, use the contact form or start a new thread on the Creativity Prompt Flickr Group!!!

I would also be very happy to see your own creations, so don’t be shy and share 🙂

Make Your Own Planner Workshop
This year you can really make your dream come true!

“Capture Your Dream” workshop is a self-paced, six weeks long workshop, that will walk you through a journey of capturing your biggest dream and making it come true.

In the process of making your dream happen – with lots of inspiration and guided self-exploration, you will also create a mixed media mini album from scratch and learn many tips and techniques – including some photography pointers that will add character to your photos and will help you take better pictures of your projects.

The workshop includes 30 printable PDF lessons with step-by-step pictures and instructions as well as several printable templates you may use in other projects too.

I am confident you will enjoy it and find it helpful so I also offer full money back guarantee while the workshop lasts.

Fancy A Freebie? Printable Journaling Labels

Tuesday, March 2nd, 2010

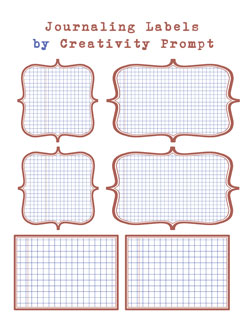
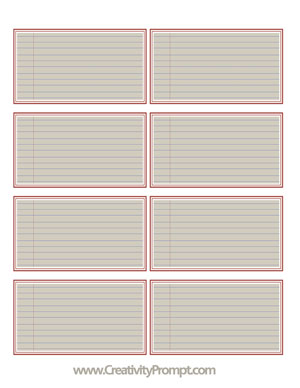
Printable Journaling Labels
For a reason, unknown to me, I have been fascinated with squared paper (and squared Japanese tape) lately.

As always, when something makes me happy, I open my Photoshop Elements and try to create it, so I can have unlimited amount of it…

Here is a variety of squared journaling labels I whipped up and wanted to share with my beloved readers.

Feel free to download it and use it for your amazing stories and precious memories [Click on the image to download the file. Personal use only]

I’d love if you came back and showed me, or told me, how you used those journaling labels.

Spread the word so others can enjoy the freebie too.

More free printables for your personal disposal.

Make Your Own Planner Workshop
Check out Creativity Prompt’s self paced workshop: “Capture Your Dream”. In this workshop you will capture, follow and make your dream come true as well as document your journey in a mixed media mini album.

Build A Scene OR Paper Piecing Card – Creativity Prompt

Saturday, February 27th, 2010

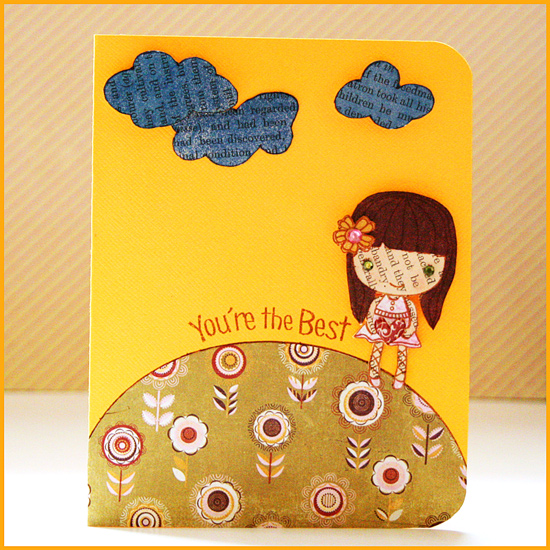
Paper Piecing Card

Way back, when I was a wee kid, my sister used to tell me the most wonderful made-up stories. I was completely mesmerized by her stories, not to mention extremely gullible…

My favorite stroy was about a magic typewriter, hidden in a secret compartment inside the wall (I used to spend HOURS looking for it). Everything you type on it with the words: “I wish” at the beginning, comes true. You could write short sentences such as ‘I wish I had ice-cream with hot chocolate sauce…‘ and immediately enjoy the treat, or you may materialize imaginary worlds, built from scratch with the power of your words (These were my favorite types of stories).

In crafts, as in creative writing or story telling, you may build imaginary worlds from scratch and go as far as your imagination and creativity go.

Go ahead and build a scene. Let your inner creative child guide you through the labyrinth of your vast imagination.

Step by Step Instructions

  1. Adhere a vintage text paper onto a plain, non-textured cardstock using glue stick.
  2. Stamp your image a few times on different patterned papers, including on the vintage text paper. Use as many patterned papers as the number of pieces you want to combine together.
  3. Cut each piece of your image with precision scissors.
  4. Start assembling the “scene”: Adhere the “flat” pieces with a glue pen and the dimensional pieces with foam dots.
  5. For the “hill” – cut a piece of patterned paper in a curve.
  6. Draw some freehand clouds on your leftover text paper and cut the out with precision scissors.
  7. Spritz your “clouds” with Glimmer Mist.
  8. Stamp or punch the little heart on a reddish patterned paper. Apply some Glossy Accent. Let dry and cut out. Adhere to the image with a foam dot.
  9. Stamp the greeting in a curve, by laying it that way on the acrylic block.
  10. Add some gems for the finishing touches.

Share

If you have any question, suggestion or remark – don’t hesitate to contact me – either leave a comment here, use the contact form or start a new thread on the Creativity Prompt Flickr Group!!!

I would also be very happy to see your own creations, so don’t be shy and share 🙂

Make Your Own Planner Workshop
Check out Creativity Prompt’s self paced workshop: “Capture Your Dream”. In this workshop you will capture, follow and make your dream come true as well as document your journey in a mixed media mini album.

Hybrid Cards – Mix Fancy With Funky

Tuesday, February 23rd, 2010

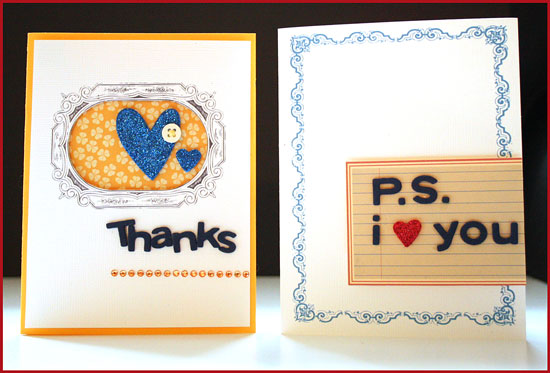
Hybrid Cards - Mix Fancy With Funky

I was looking at Shimelle’s new kit: Write It Down Ornate Frames, which “aired” today on Two Peas In A Bucket, and thought it would be just perfect for making a bunch of hybrid cards.

At first I thought to edit them on photoshop, add the greeting with one of my gazillion fonts, print out, add a ribbon, or some gems and call it a day. A great way to make a bunch of coordinating classic cards.

Then I thought, lets take it up a notch… It would be really cool to mix Shimelle’s beautiful, classical, traditional ornate frames with some funky patterned papers and a funky – non-traditional – design, and that’s exactly what I did.

I hope you like it and will give it a try. (Shimelle’s kit costs just 99 cents…)

Step by Step Instructions

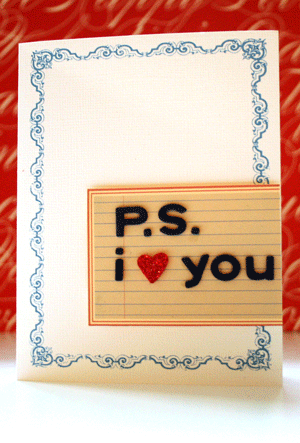
Hybrid I Love You Card

  1. Use a photo editing program to lay the frame on the right side of a letter size document. Size it to measure 4″ by 5¼”. Print out the document on textured white cardstock, using the borderless settings of your printer.
  2. Cut the cardstock in half – to 5½” and fold in half at 4¼” to create a standard size card.
  3. Print out Creativity Prompt’s free classic journaling tags on plain non-textured cardstock. Cut out one of the tags and cut off about an inch from its right edge.
  4. For the letters I used plain and glittered fun foam that I cut with my Cuttlebug, using QuicKutz Moonlight dies, and adhered it with Tombow Mono Multi glue you can also use American Crafts Thickers.
  5. Adhere the journaling tag to the bottom right edge of the card using foam squares.

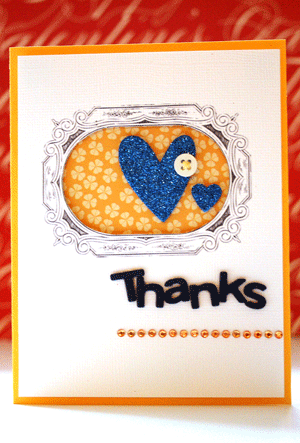
Hybrid Thanks Card

  1. Use a photo editing program to lay the frame on the right side of a letter size document. Size it to measure about 3½” wide (keep its proportions). Print out the document on textured white cardstock, using the borderless settings of your printer.
  2. Cut the cardstock to 5¼” by 4″.
  3. Use a craft knife to cut off the oval center of the frame.
  4. Cut a textured yellow cardstock to 8½” by 5½” and fold in half at 4¼” to make a standard size card.
  5. Cut a piece of a funky patterned paper at 3½” by 3½”.
  6. Lay the printed cardstock on the yellow card base and trace the oval window with a pencil. Adhere the patterned paper where the window will lay, over the pencil marks.
  7. For the letters I used plain and glittered fun foam that I cut with my Cuttlebug, using QuicKutz Moonlight dies, and adhered it with Tombow Mono Multi glue you can also use American Crafts Thickers.
  8. Adhere the printed cardstock with foam squares.
  9. Adhere the hearts. I Cut the heart with a Cuttlebug die from the glittered fun foam. (I used a VERY old punch for the small heart)
  10. Adhere the button (I would have used a yellow button if I had one…) with a couple mini glue dots.
  11. Adhere the line of yellow gems below the greeting.

Share

If you have any question, suggestion or remark – don’t hesitate to contact me – either leave a comment here, use the contact form or start a new thread on the Creativity Prompt Flickr Group!!!

I would also be very happy to see your own creations, so don’t be shy and share 🙂

Make Your Own Planner Workshop
“Capture Your Dream” workshop is relaunching as a self-paced workshop. Isn’t this the perfect time for you to capture your dream and make it happen?

Printable Freebie – Classic Journaling Tags

Monday, February 22nd, 2010

I have had a great day, following a great weekend.

During the weekend, I had fun with friends: eating good food and engaging in good conversation. Enjoying their friendliness and hospitality.

I also Pulled out my acrylics and an old canvas and painted after a loooong time I haven’t painted anything other than a scribble here and there in my handmade art journal.

I also got a few happy mails.

Today was not supposed to be the greatest, after my neighbor’s kid kept me wide awake before 5am…
(and the wee piggy-tailed princess is so sweet, I can’t even get mad at her)

Nevertheless, I managed to keep up my original schedule and haven’t even napped once.

I call this a good day. A WIN day.

In light of my surprisingly good mood I would like to share some of the fruits of this day with you guys with a printable freebie:

Free Classic Journaling Tags

Click Here to download the free journaling tags.

How was your weekend and how was you Monday? Tell me…

Make Your Own Planner Workshop
“Capture Your Dream” workshop is relaunching as a self-paced workshop. Isn’t this the perfect time for you to capture your dream and make it happen?

Daily Reoccurrences – Journaling Prompt

Thursday, February 18th, 2010

Daily Reoccurrences

[Fonts: Rough Typewriter, Walk Around The Block; Digital Kits: Digi Essentials #2 by Karla Dudley & Write It Down Top Ten Lists + Long and Winding Road – both by Shimelle Laine.]

Journaling Prompt

One of the disadvantages of a repeated daily routine is that its details are forgotten and lost.

We are so used to repeat the same errands or be with the same people every day that we don’t always notice things about them. We don’t notice the small details of what occurs daily without fail.

In my journey to document and remember as much as I can, I try to take heed of things that I can count on – for better or for worse – to occur and reoccur every single day.

This journaling prompt is general and can refer to people who do certain things in a certain way – every day, or it can refer to errands we run daily (or several times per day, OCD?!), food we eat or beverages we drink daily, etc.

In this layout I highlighted a few of my husband’s behaviors that come up each and every day – and I love him for that… It’s the small things that count most.

Share

Leave a comment and share what things occur daily, without fail? I’d love to get a sneak peek into your dailyness (& I don’t care it isn’t a proper English word. I like it nonetheless).

Make Your Own Planner Workshop
“Capture Your Dream” workshop is relaunching as a self-paced workshop. Isn’t this the perfect time for you to capture your dream and make it happen?

Note The Changes Over A Period Of Time – Journaling Prompt

Sunday, February 14th, 2010

Note The Changes In A person

[Fonts: Vegur, Popsies; Digital Kits: Blakely, Digi Essentials #2, Digi Essentials #3 – all by Karla Dudley]

Journaling Prompt

I have recently come back from a visit back home. This time it’s been over a year since my last visit and a lot have changed. I was astonished by all the changes.

Some changes are subtle and creep up on you very slowly.

Such is a crack in the cement and a peeling of the wall and stains that keep on expanding until you climb up the staircase you used to climb on throughout your childhood and you cannot recognize it anymore. It looks old and disengaged. It became alien.

Such are wrinkles that add up one by one, until the wrath or love of time is boldly noted.

Having said that, some changes are rapid. They usually occur in children. A baby becomes a child.

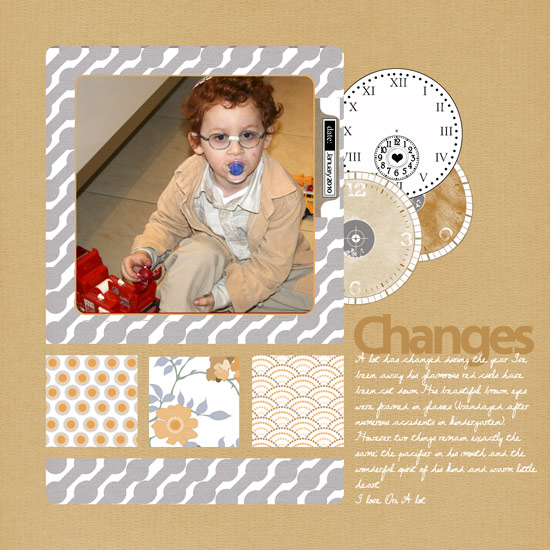
In this layout I documented the changes in my youngest nephew: Ori (Who will be celebrating his 4th birthday this week). Ori is Asaf‘s brother. This is what the journaling reads:

A lot have changed during the year I’ve been away. His glamorous red curls have been cut down. His beautiful brown eyes were framed in glasses (bandaged after numerous accidents in kindergarten). However, two things remain exactly the same: the pacifier in his mouth and the wonderful spirit in his kind and warm little heart. I love Ori. A lot.

Document the changes you note in something or in someone after a long period of time you haven’t seen it or him.

Sometimes a day can be a long period of time and sometimes only after a decade changes start to become apparent.

Share

Have you been startled by a change lately? share your thoughts by leaving a comment. I really want to hear so please share.

Make Your Own Planner Workshop
“Capture Your Dream” workshop is a self-paced workshop. Do you to capture your dream and make it happen?

If You Are Handsome And You Know It Clap Your Hands – Here’s To Small Observations

Thursday, February 11th, 2010

If You Are Handsome And You Know It Clap Your Hand

[Fonts: Rough Typewriter, Print Bold, Aharoni; Digital Kits: Can’t Buy Me Love by Shimelle Laine, Holiday Party by Brandy Buffington, Color My World by Rhonna Farrer – all available at Two Peas In A Bucket & Digi Essentials by Karla Dudley available at The Digichick Shop (the stitches).]

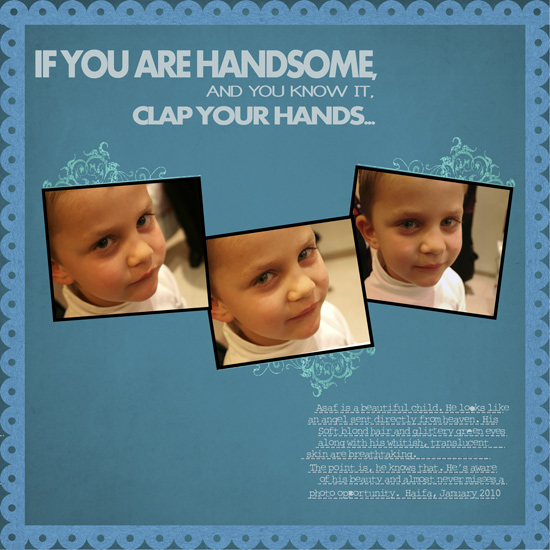
Asaf is my nephew and he is a beautiful child. He is also aware of his angelic beauty and likes to be captured by camera.

I have noticed the twinkle in his eyes and his shy look whenever I take the camera out of the bag.
I have noticed how he suddenly stops his latest fit just to stand – with all the patience in the world, waiting for the shutter to run its course.
I have noticed how he gradually develops a smile that grows into a grin as I take more and more pictures.

Asaf is my nephew and he is a beautiful – breathtaking, stunning, amazingly pretty – little child.

I have noticed he likes his pictures to be taken.

I love it!

Journaling Prompt

Have you made a characteristic observation of one of your loved ones? Write it down. Document and immortalize it.

Share

What small observation have you made lately? Share by leaving a comment.

Make Your Own Planner Workshop
“Capture Your Dream” workshop is relaunching as a self-paced workshop. Isn’t this the perfect time for you to capture your dream and make it happen?