/** Font types */

Author Archive

Random Sharing

Tuesday, November 16th, 2010

this is a super random and very quick post…

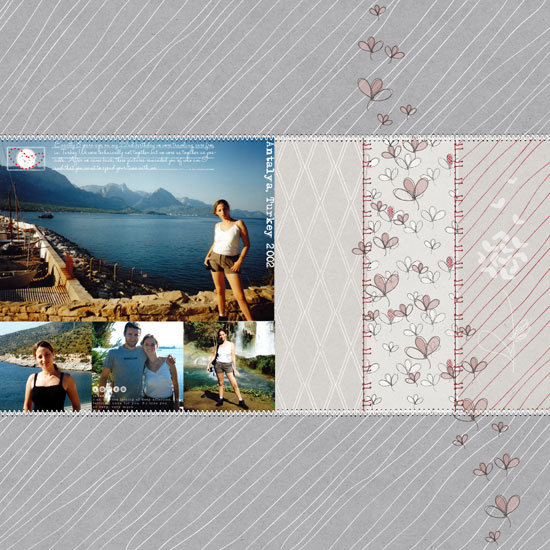
A couple readers shared a link to their take on the micro journaling concept and I love, love, love them both.

The first is by the super talented Alexandra who made a layout documenting a certain moment in time. She actually posted it over a month ago and I cannot believe that I missed such a gorgeous post on my RSS reader. This post (and the blog itself) is a collaboration of a few super-super-super talented scrapbookers and is really delightful.

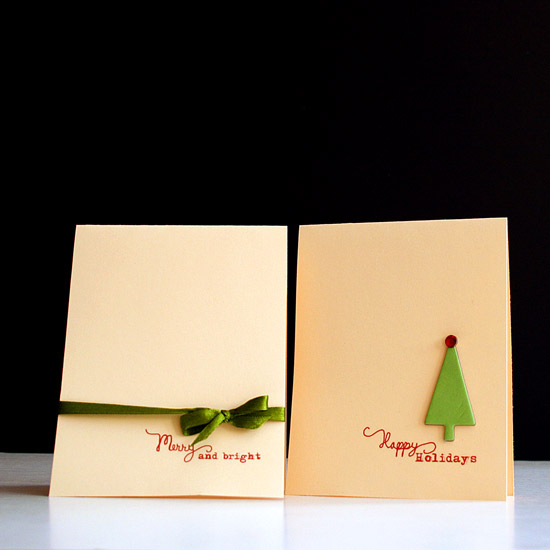
The second reader who shared her interpretation of the concept is Cate who made beautiful Christmas little diaries, take a look, it’s totally rad plus she includes a cute free download.

Last but certainly not least, I wanted to share a link to a handy dandy compilation of links to everything you have ever wished to know about book binding. My reader, Anette Berlin shared that treasury with me and I am very glad she did 🙂

Share

Is there anything fabulous you would like to share with me and my readers? Please, do leave a link to an inspiring crafty project or share a rad idea!
Make Your Own Planner 2012
Check out Creativity Prompt’s new and unique self paced workshop: “Make Your Own Planner”.
This workshop will show you how to make a beautiful handmade planner for the year 2012. Not only are you going to get the entire meticulously designed planner kit for instant download, but you will also get a high resolution video tutorial as well as step-by-step instructions to guide you on each step of the way. Either treat yourself with a fresh and creative start for the coming new year, or get it to create wonderful gifts for your family and friends.
Join now
Micro Journaling – Current Journal

Monday, November 15th, 2010

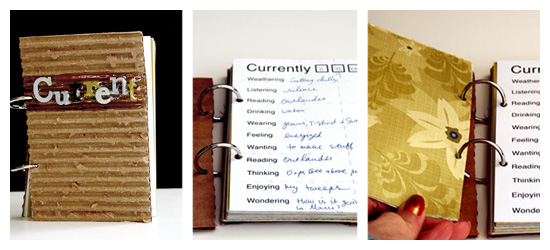
Current Journal

I saw this idea first on Elise Blaha’s blog and I fell in love immediately. Apparently, the first to start the awesome “Currents” movement is talented Tina Aszmus – kudos to her.

The idea of micro journaling is just perfect for someone who likes to record everyday life but feels overwhelmed about it [Me. Me. Me].

One of my favorite things is going over old journals and reliving the days I took the time to record.

One of my deepest regrets is getting rid of the journal I’ve had all through high school and through law school. I mostly wrote bad things in it. Bad experiences. I think most of it was filled with teen unrequited love (I believe that goes hand in hand with being a teenager).

At the time I got rid of it I thought it will be therapeutic to get rid of all the harsh memories and concentrate on all the happiness and loveliness I have in my life. But in retrospective, I do regret throwing it away, because it seems like I have thrown away parts of my life. Not to mention that some of my best writing was manifested there.

Anyhow, let bygones be bygones. [and it’s not like I can unearth it from the dumpster in Dublin]

This mini journal was so easy to make and I printed it on the back side of some OLD [even ancient] patterned papers. I got hooked on the idea of printing on patterned paper after I saw one of my workshop’s member, Mandy do that – amazingly! The only difference is that I printed mine on the back side of the pages and Mandy used double sided papers and printed her pages on the pattern.

Tools & Supply

  • Word processing software (I’m not providing a printable, because it isn’t an original idea of mine)
  • Old patterned paper
  • Recycled cardboard
  • Crop-a-dile
  • Binding rings
  • Chipboard letter stickers [mine are from Making Memories “5th Avenue” collection that I bought a while back]

How To

  1. Create a 4″ by 6″ page with your regular word processing software (make sure the page settings are set to the right size for easy printing) where you make a list of the categories you want to record
  2. Cut all your extra paper to 4″ by 6″ pieces (6 pieces out of each 12 by 12 sheet, unless you discard parts that have the company’s logo on it)
  3. Feed your cut paper through your printer, the same way you put a 4″ by 6″ photo paper in it to print photos.
  4. Cut 2 thicker 4″ by 6″ pieces for the cover. I used corrugated cardboard.
  5. Punch hols for the binding (or use any binding system that you love using).
  6. Bind all the pages together with binding rings or ribbon.
  7. Write. Write. Write. [Just put it on your desk, nightstand or purse and fill in a page whenever you have a minute – that’s all it takes].

Share

What do you think about the idea of micro journaling? Share your thoughts by leaving a comment.

Make Your Own Planner 2012
Check out Creativity Prompt’s new and unique self paced workshop: “Make Your Own Planner”.
This workshop will show you how to make a beautiful handmade planner for the year 2012. Not only are you going to get the entire meticulously designed planner kit for instant download, but you will also get a high resolution video tutorial as well as step-by-step instructions to guide you on each step of the way. Either treat yourself with a fresh and creative start for the coming new year, or get it to create wonderful gifts for your family and friends.
Join now

Friday Freebie – Printable Holiday Cards

Friday, November 12th, 2010

Free Holiday Cards

This week I have a special treat for you guys, a set of a couple printable holiday cards (for personal use only).

To download it simply click on the image (or the link) and if it doesn’t work try to right-click on it and opt for the “save target as…” option (it may be phrased a bit differently on different operating systems – but do NOT opt for the “save image as” option, as you will get the low resolution tiny preview image).

To use them, simply print the PDF file on a letter sized cardstock, cut them, lengthwise, at 4¼” and fold each piece in half, inward. That’s it.

You can then add a ribbon, a chipboard element or leave it clean and simple, as is. No more than a minute per card.

Now, as much as I appreciate Jennifer Mc’Guire‘s beautiful, artistic cards that every single time make my eyes pop or Lisa Spangler‘s adorable and beautifully made cards and as much as I love Kristina Werner‘s graphic style and creative use of products as well as many other über talented and creative card-artists out there – when the time comes to send dozens, if not hundreds, of holiday cards – I don’t think it is practical to engage in such intricate card making [not to mention one must also be as talented as they are to achieve all of that].

Therefore I always keep it quick and simple and there’s NOTHING SIMPLER than printing, cutting and folding in half…

I hope my mischievous methods will also be helpful to you in this holiday season.

You can always make a few special, more time consuming cards to your close family and best friends…

Make sure you didn’t miss the rest of the free printables on Creativity Prompt.

Share

How are you handling the card giving season, excuse me, the holiday season…? Please leave a comment and share 🙂

Make Your Own Planner 2012
Check out Creativity Prompt’s new and unique self paced workshop: “Make Your Own Planner”.
This workshop will show you how to make a beautiful handmade planner for the year 2012. Not only are you going to get the entire meticulously designed planner kit for instant download, but you will also get a high resolution video tutorial as well as step-by-step instructions to guide you on each step of the way. Either treat yourself with a fresh and creative start for the coming new year, or get it to create wonderful gifts for your family and friends.
Join now

The Baker’s Dozen Blog Hop

Thursday, November 11th, 2010

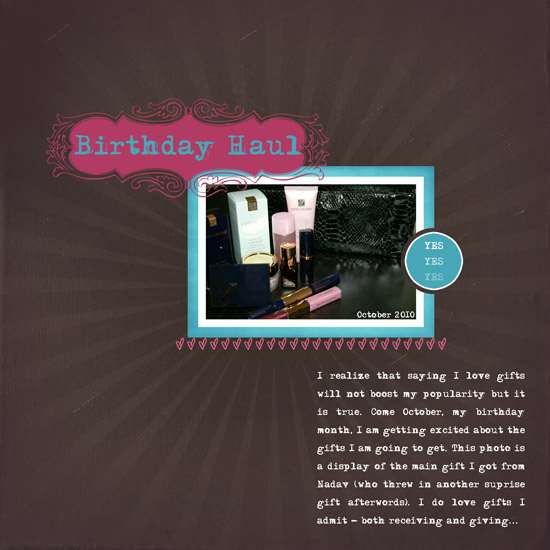
Birthday Haul

[Font: Adler; Digital Kits: Starburst Solids, Write It Down Pretty Labels, Springtime Basics and Can’t Buy Me Love – all by Shimelle Laine for Two Peas In A Bucket.]

I can’t believe a year has passed since I first joined Shimelle Laine’s Baker’s Dozen, i.e. Shimelle Digitals Design Team.

To celebrate a year of co-scrapping with another 12 talented gals we have put together this blog hop.

A lot has happened during that year. Some gals got married. Some moved to a new home. Some had to care for a sick loved one and some were ill themselves. But throughout the year everyone was lovely, supportive, quick with a kind word and filled with creativity. I am so honored to have been working with such an awesome bunch.

If you want to meet them all, start with Karen who starts the hop.

If you came over to me through Kate’s blog, then hop over to Dolly.

Make Your Own Planner 2012
Check out Creativity Prompt’s new and unique self paced workshop: “Make Your Own Planner”.
This workshop will show you how to make a beautiful handmade planner for the year 2012. Not only are you going to get the entire meticulously designed planner kit for instant download, but you will also get a high resolution video tutorial as well as step-by-step instructions to guide you on each step of the way. Either treat yourself with a fresh and creative start for the coming new year, or get it to create wonderful gifts for your family and friends.
Join now

Heart Breaker And The Miraculous Act Of Extraction

Wednesday, November 10th, 2010

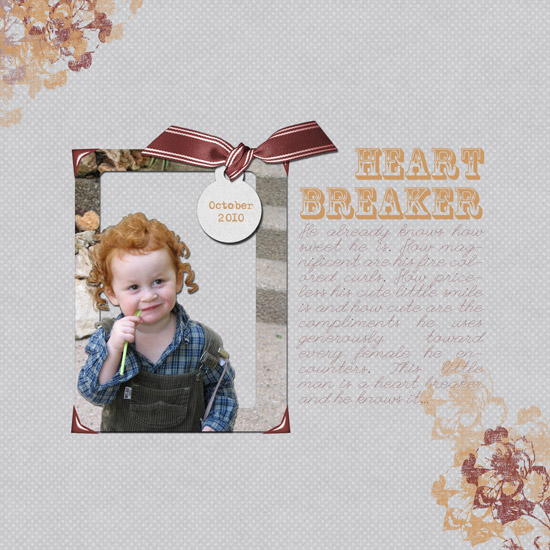
Heart Breaker

[Fonts: Adler, Rosewood and League Script; Digital Kit: Our story by Karla Dudley for DHD.]

I was so honored to find out on the 2Ps Digi Designers blog last week that Shannon, the digital pea of the week, had picked one of my layouts as a favorite. That’s why I took it as a personal challenge to create a digital layout using an extraction, which has been Shannon’s challenge for this week.

I picked a picture of my youngest nephew (for the time being…), Ori for two reasons.

First, he’s so darn cute.

Second, because his beautiful, dare I say PERFECT, curls will be beautifully accentuated by extracting them from the background.

Let me take you through the process of extraction…

How To in Photoshop Elements

  1. Pick the Quick Selection Tool and choose a brush size you feel comfortable with. I always start with a bigger brush and go smaller as I move into the smaller areas of the photo. To easily change the size of your brush use the bracket keys (‘[‘, ‘]’).
  2. To select an area you need to click on it and the quick selection tool will do its magic by figuring out the changes in colors and tones. You can adjust its sensitivity if you wish to do so, by clicking the drop menu that comes out of the brush indicator on the top of the window (above the rulers). The more pronounce the object is compared to its background, the smoother the selection will be.
  3. After the image you want to extract is selected press ctrl+J with a PC and cmd+J with a MAC to create another layer with the extracted image. It will not be perceivable until you conceal the layer with the original photo. You can do that by clicking the eye icon next to the layer on the layers’ bar.
  4. Now that the extracted image is clearly visible, you may clean up random pixels by erasing them. Make sure your extraction layer is highlighted, so you won’t accidentally erase something else on your page.
  5. Now you can do anything to the original photo layer, as long as the extracted image stays on top. Note, that if you keep both layers, I advise you to link them together.
    • You can delete the photo all together and work just with the extraction.
    • You can blur it, to make the extracted image pop up – make sure the photo’s layer is highlighted. Go to ‘filter’ – ‘blur’ – ‘Gaussian blur’ and play around.
    • You can delete just part of the layer, like I did. Draw a shape on the photo – make sure the shape’s layer is between the photo’s and the extracted image’s layer. Select the area around the shape by pressing ctrl or cmd while you click on its icon. Then conceal or erase the shape’s layer and while the area is still selected and the photo’s layer is highlighted – press delete.

That’s it. super easy, right?

Journaling Reads:

He already knows how sweet he is. How magnificent are his fire colored curls. How priceless his cute little smile is and how cute are the compliments he uses generously toward every female he encounters. This little man is a heart breaker and he knows it…

Share

Do you use extractions on your layouts?

In traditional scrapbooking it means cutting around the image you wish to extract… I used to do that all the time.

Make Your Own Planner 2012
Check out Creativity Prompt’s new and unique self paced workshop: “Make Your Own Planner”.
This workshop will show you how to make a beautiful handmade planner for the year 2012. Not only are you going to get the entire meticulously designed planner kit for instant download, but you will also get a high resolution video tutorial as well as step-by-step instructions to guide you on each step of the way. Either treat yourself with a fresh and creative start for the coming new year, or get it to create wonderful gifts for your family and friends.
Join now

Video Tutorial – Dimensional Ornaments Card

Tuesday, November 9th, 2010

Dimensional Ornaments Card

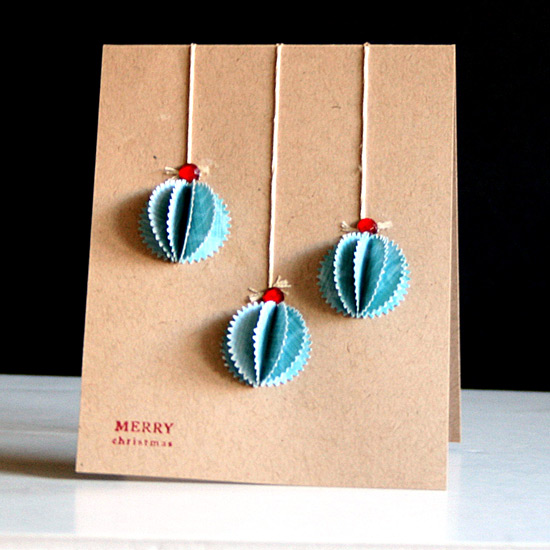
I wanted to share with you a quick and simple card I made. You can also use the same technique to create ornaments for your tree. You may use any symmetrical shape to make it.

Supply

How To


[Go here to watch on YouTube and while there, please rate, comment and subscribe.]

Step by Step Instructions

  1. Cut you cardstock at 4¼” lengthwise and fold in half to create your card base.
  2. For each ornament, punch 5 punched pieces of patterned paper and fold each one in half.
  3. Adhere only one half of the punched piece to the second one, making sure the edges are aligned and repeat on all five punched pieces.
  4. Repeat for all the ornaments you want to add to your card.
  5. Decide how you want to lay your ornaments on your card and pierce a hole on top of each ornament and another hole on the fold of the card in a straight line above each ornament.
  6. Thread your embroidery floss through both pierced holes and tie at the bottom, close to the top of each ornament.
  7. To secure the knot, apply a glob of a strong liquid glue on each knot and attach a gem to it, to conceal the glue.
  8. Adhere the ornaments below each knot.
  9. Stamp your greeting.

Share

What holidays are you celebrating in the next couple months? I am really excited about Hanukkah, the Festival of Lights. Share yours by leaving a comment below.

Make Your Own Planner 2012
Check out Creativity Prompt’s new and unique self paced workshop: “Make Your Own Planner”.
This workshop will show you how to make a beautiful handmade planner for the year 2012. Not only are you going to get the entire meticulously designed planner kit for instant download, but you will also get a high resolution video tutorial as well as step-by-step instructions to guide you on each step of the way. Either treat yourself with a fresh and creative start for the coming new year, or get it to create wonderful gifts for your family and friends.
Join now

Friday Freebie – Hanukkah Daily Labels

Friday, November 5th, 2010

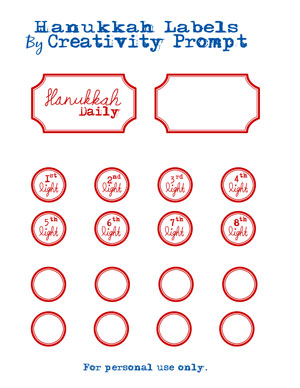
Hanukkah Daily LabelsAfter posting a set of December Daily labels for you guys, I wanted to represent the Jewish people as well with a set of Hanukkah daily labels (for personal use only).

As there are only 8 days of Hanukkah, I included 8 day tags as well as 8 empty tags you can use as you please. The circles can be punched out with a 1″ circle punch. Easy peasy.

To download it simply click on the image (or the link) and if it doesn’t work try to right-click on it and opt for the “save target as…” option (it may be phrased a bit differently on different operating systems – but do NOT opt for the “save image as” option, as you will get the low resolution tiny preview image).

I hope you like it and have lots and lots and lots of fun with it.

Make sure you didn’t miss the rest of the free printables on Creativity Prompt.

Share

Are you making a Hanukkah daily mini album or a similar project to record the jolly holiday season? Please leave a comment and share.

Make Your Own Planner 2012
Check out Creativity Prompt’s new and unique self paced workshop: “Make Your Own Planner”.
This workshop will show you how to make a beautiful handmade planner for the year 2012. Not only are you going to get the entire meticulously designed planner kit for instant download, but you will also get a high resolution video tutorial as well as step-by-step instructions to guide you on each step of the way. Either treat yourself with a fresh and creative start for the coming new year, or get it to create wonderful gifts for your family and friends.
Join now


Welcome Little One Workshop
Check out Creativity Prompt’s new and unique self paced workshop: “Welcome Little One”. This workshop will provide you with everything you need, and then some, to make a fabulous handmade mini album to record the first moments of a new born baby.


Make Your Own Planner Workshop
Check out Creativity Prompt’s self paced workshop: “Capture Your Dream”. In this workshop you will capture, follow and make your dream come true as well as document your journey in a fabulous mixed media mini album.

Face Your Fear – No Strings Attached

Thursday, November 4th, 2010

Mr. Snake

[Fonts: Marketing Script Shadow, Adler and League Script; Digital Kit: Our Story by Karla Dudley for DHD.]

Journaling Reads

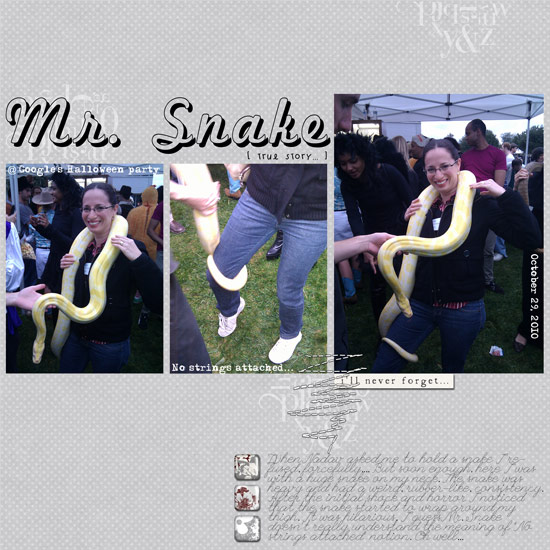
When Nadav asked me to hold a snake I refused, forcefully…. But soon enough, here I was with a huge snake on my neck. The snake was heavy and had a weird, rubber-like, consistency. After the initial shock and horror I noticed that the snake started to wrap around my thigh. It was hilarious. I guess Mr. Snake doesn’t really understand the meaning of “No strings attached” notion. Oh well…

I am not a brave person.

More specifically, I am TERRIFIED of snakes.

I keep imagining there are snakes lurking whenever we go hiking in the woods or in a rocky trail.

I am crazy like that.

Therefore when my husband had the genius idea to put a HUGE snake around my neck – I wasn’t exactly happy about it. To say the least.

But my husband has this quality about him to persist and insist until he gets his way.

And so he did.

And so I ended up holding the huge snake.

Facing my fears.

Breathing slowly, in and out. In and out.

And I made it without a heart attack, or any other attack.

I even enjoyed it.

It was rather amusing that the snake started wrapping its tail around my leg and didn’t want to let go.

What do you think?

P.S. Did you check out yesterday’s Giving Thanks Journal workshop? It’s free.

Make Your Own Planner 2012
Check out Creativity Prompt’s new and unique self paced workshop: “Make Your Own Planner”.
This workshop will show you how to make a beautiful handmade planner for the year 2012. Not only are you going to get the entire meticulously designed planner kit for instant download, but you will also get a high resolution video tutorial as well as step-by-step instructions to guide you on each step of the way. Either treat yourself with a fresh and creative start for the coming new year, or get it to create wonderful gifts for your family and friends.
Join now
Free Workshop – Giving Thanks Journal

Tuesday, November 2nd, 2010

Thanksgiving Journal

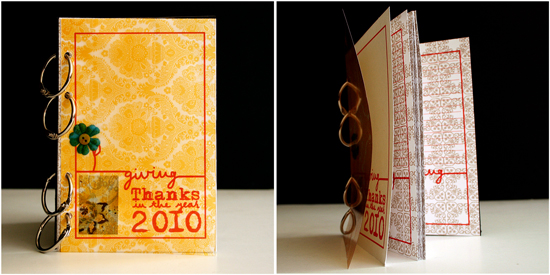
Thanksgiving Day is quickly approaching and I thought that a great way to give thanks is to collect all the things and all the people we are grateful for and write about them in a mini journal.

This Giving Thanks journal is what I came up with. It is 4″ by 6″ so it fits perfectly with 4″ by 6″ standard size photos and therefore quick and easy to put together.

I made the journal kit for you and created a video showing you how to put the journal together – in REAL TIME. You wouldn’t believe how easy it is to make.

Feel free to use it as many times you need, for personal use only and don’t forget to link back here, if you show your project online 🙂

The Journal Kit

To download each of the journal pages – right click on the link below and opt for “save target as”:

  1. Cover page. [Print once on 4″ by 6″ piece of cardstock]
  2. Insert page. [Print as many time as you want, on 4″ by 6″ paper. You can also use the backside of your photos to print on]

Supply

  • Cardstock – to print the journal pages on. You can also use patterned paper or the back side of your photos for the inner pages. Each sheet of 12″ by 12″ patterned paper yields 6 pieces of 4″ by 6″ paper.
  • Cover pieces – I used 4″ by 6″ transparency and 4″ by 6″ piece of chipboard.
  • Hole punch
  • Small binding rings (or ribbon, twine, etc.)
  • Pencil

How To


[Go here to watch on YouTube and while there, please rate, comment and subscribe.]

Step by Step Instructions

  1. Print the journal pages. You need 1 cover page and as many inserts as you please. It is simpler to first cut all the pages to 4″ by 6″ and then use them with your printer, the same way you would use photo paper.
  2. Punch all the punching holes by aligning the black punching marks with your hole punch. Make sure both the mark and the hole punched are centered together – then punch.
  3. To punch the chipboard piece (and your insert photos) align any of the punched pages with the chipboard piece and mark all the holes with a pencil. Then repeat the previous step with the chipboard.
  4. Put together all your pages and bind with the binding rings.

Share

What are you thankful for this year?

If you enjoyed this workshop you would probably enjoy the more elaborate “print and assemble” workshops by creativity prompt.

Try “Welcome Little One” if you are expecting a new baby to enter your life or the life of a loved one and “Make Your Own Planner 2012” to create your very own industrial chic planner.

Be You – A Blast From The Past

Monday, November 1st, 2010

Be You

[Fonts: Adler and Halo Handletter; Digital Kits: mostly “Be You” and the white stitches are from Digi Essentials Elements – all by Karla Dudley.]

Journaling Prompt

Karla Dudley’s new collection Be You has inspired me to look for a picture that can showcase who am I.

I do not have that many pictures of myself, as I am mostly on the other side of the camera… (not such a good idea) but I still have a few laying around. The pictures I have are from different times in my life, so they made me thinking of people and who they are.

People change all the time. They change physically, emotionally, professionally, romantically and in many other ways too.

However, even after a person changes he still carries around with him some of what he was before.

I am not different. I carry with me lots of bits and pieces of what I have been in my life time.

I carry with me an obsession for reading that my 5 year-old self sparked when she started reading on her own.

I carry with me the resilience of my 6 year-old self who overcame a serious illness.

I carry with me passion for fashion and design from my 11 year-old self who wanted to be a fashion designer and draw different outfits relentlessly.

I carry with me the love of writing that my 15 year-old self used when she won two writing competitions.

I carry with me the leadership and responsibility of my 17 year-old self who was the head of her school’s student body.

I carry with me the fear of war and redundant hatred from when my 18 year-old self survived an atrocious murder but my best friend’s sister didn’t.

I carry with me the sense of accomplishment of my 24 year-old self who got her license to practice law after 4 years at the university and a year as an intern.

I carry with me a strong moral campus I got from my 25 year-old self who sought truth and justice and was willing to work 60-hour weeks, sometimes 76… to get it.

I carry with me the joy of tying the knot with my one and only true love, my husband Nadav.

I carry with me the adventurousness of my 27 year-old self who left everything and moved abroad with her husband of 3 months.

I carry with me the ability to cope and adjust from my 28 year-old self who had moved again to another country in another continent, even farther away from home.

I carry with me bits and pieces from every day I have lived on earth and every bit and every piece is making me who I am today.

Share

What are you carrying with you from your old self? Share by leaving a comment.

Make Your Own Planner 2012
Check out Creativity Prompt’s new and unique self paced workshop: “Make Your Own Planner”.
This workshop will show you how to make a beautiful handmade planner for the year 2012. Not only are you going to get the entire meticulously designed planner kit for instant download, but you will also get a high resolution video tutorial as well as step-by-step instructions to guide you on each step of the way. Either treat yourself with a fresh and creative start for the coming new year, or get it to create wonderful gifts for your family and friends.
Join now