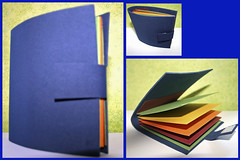
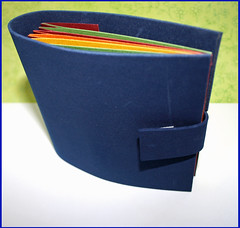
 There are days in which I want to color the world around me in the colors of the rainbow. Days in which some “pick me up” color treatment wouldn’t hurt. Do you also have days like these sometimes? If so, then I have the perfect project: A rainbow colored mini album with an accordion fold spine and to finish things off, it is covered in a soft fun foam. (Is it wrong to cuddle with your mini-album? I am not sure I want to hear the answer…)
So if you want to learn how I made this cutie, stay tuned and keep on reading:
Tools and Supply
- Fun foam sheet.
- Cardstock. [You will need a total of five 4″ by 8″ pieces. A sheet of 12″ by 12″ yields 4, but in order to make this mini colorful, you’ll need 5 different colors – your choice].
- Self adhesive Velcro [A tiny ½” by ¾” piece will do]
- Strong double sided tape adhesive.
- Tape adhesive runner.
- Paper trimmer.
- bone folder.
- Scissors.
- T-square ruler [or any other ruler that can help you draw straight lines].
how To
[Music by Josh woodward]
Step By Step Instructions
- To make your spine, cut your cardstock at: 4″ by 8″.
- Score the cardstock at 1½” on each side and then every ½” in between the initial score lines.
- Fold all your score lines in an accordion fold. That means a “mountain” fold (folding down) is followed by a “valley” fold (folding up). Make sure your creases are sharp by burnishing them well with the bone folder.
- Cut the 5 cardstock signatures – 4″ by 8″ each. Score them at 4″ and fold in half.
- Attach the signatures by applying a strong double-sided tape adhesive to each of the ½” folds. Apply the adhesive as close as possible to the crease but not directly on it. Apply some additional tape adhesive runner to all 4 inside edges of the signatures and attach to the spine. “Hug” each “mountain” fold in the spine with 1 signature.
- For the cover cut your fun foam at 4½” by 12″.
- Lay down your signatures on the fun foam and make sure you have enough room to cover them and then start marking the remaining flap, as follows:
- Find the middle (lengthwise) and make two pencil marks – ½” downward and upward from the middle [That is going to help us create a 1″ flap in the middle].
- With a T-Square ruler, draw lines that connect the edges with your tick marks – both lengthwise and widthwise.
- Cut out the outer rectangles with your scissors.
- Attach the signatures to the cover with a strong double-sided tape adhesive.
- Attach your Velcro to the flap. I always attach the corresponding Velcro pieces together and remove the backing from both of them. Adhere one side to the flap and then close it – that adheres the corresponding piece of Velcro at the perfect spot on the cover.
Share
If you have any question, suggestion or remark – don’t hesitate to contact me – either leave a comment here, use the contact form or start a new thread on the Creativity Prompt Flickr Group!!!
I would also be very happy to see your own creations, so don’t be shy and share 🙂
More Creativity Prompts You Might Like:
Tags: accordion fold, creativity, creativity prompt, fun foam, mini-album, scrapbooking, Tutorial, Video Tutorial


Es un super tutorial, y además simple, lindo. Muchas gracias.
muy lindo y sencillo de hacer. Felicitaciones por compartir sus manualidades.